Sending emails from a Queue with the email router
Using queues to receive emails is rather common and can be great for receiving emails from generic address like support@contoso.com. However, queues in Dynamics CRM can also be used for sending emails, allowing you to send emails from generic addresses like support@contoso.com. This is, however, not as known so I thought I’d write about it a bit to let you know how it is done.
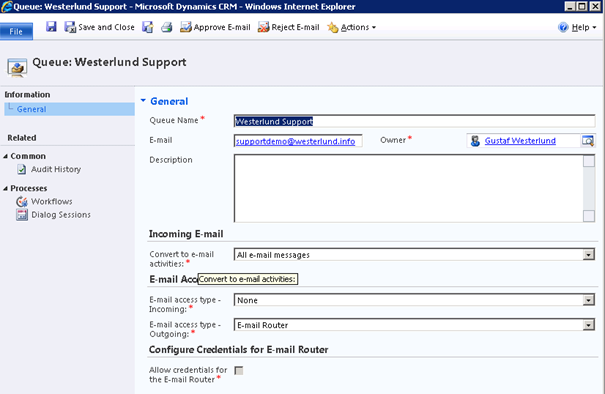
First of all, go into the Settings, and create a new Queue.

An important aspect here is that the “Queue Name” is important as this is the name that the recipients of the emails will see in as the sender. Like “Westerlund Support
You do not need to check the “Allow credentials for the E-mail Router” as this is only used for incoming emails.
The email address must be an email address to which the email credentials have access to send as. If this is virgin ground for you, there is a lot that you need to know about how email servers work in the area of relaying emails. In short, they usually are quite grumpy in order to block any spammers from using the email server to send their spam. The typical limitation is that you need to authenticate with a user to be allowed to send email, however, there are also other ways that are sometimes used, like allowing emails to be sent from user registered on the mailservers. For example, emails that have a from address support@contoso.com are allowed to be sent from the contoso mailserver but it will not allow mails from support@microsoft.com or sup@contoso.com (a non-existant email address). There are also setups that limit relaying based on the originating IP address. In essence, allowing email from any sender to be uploaded to the email server, as long as they are sent from a server with a registered specific IP-address. You need to know how this works for the email server and address that you are using. I would also suggest trying to send emails using a simple SMTP sender or simple mail program to make sure the credentials etc. are set up correctly as handling these kinds of errors in the email router is not optimal.
Press save

After pressing save, you will get a warning that the email address has not been approved, so press the button in the action bar to approve it.
Now, open the email router. If you can’t find it, it is either on the installation DVD:s for Dyn On-Premise or can be downloaded from here: http://www.microsoft.com/en-us/download/details.aspx?id=27818
Do note that it is language specific and that it has special Update Rollup bit so you will need to upgrade it to match you installation. On a CRM-Online your system will be continually updated and the router needs to be installed on a server or other permanently connected machine, which needs to be updated manually, so make sure to put that on your todo-list.

Set up your organization in the next tab (omitted in this article) test it and publish your settings.
Now, go back to CRM. Create a new Email and set the queue as the From address (it is defaulted to your user).

And then write the rest of the email.

And press send.
Do note that the email created will have the status “Sending” until it the router picks it up and sends it. This logic is based on the fact that the router will periodically check in CRM for emails to send. This is defaulted to 60 seconds.
After a while, the mail should be sent and received. This is how it looked for me:
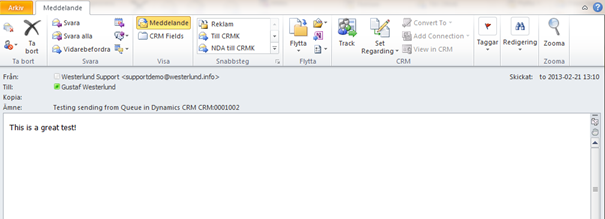
It is in Swedish, but note the field “Från” (meaning From) which says: “Westerlund Support “, being the name of the Queue.
That’s it! Hope you get it working and do drop me a note if you have some issues.
Gustaf Westerlund
MVP, CEO and owner at CRM-konsulterna AB
www.crmkonsulterna.se


Recent Comments