Anonymizing data in UAT/Dev – GDPR
On the eve of GDPR what could be more fitting than a post on GDPR. I think everyone is probably deadly tired of all the consent emails and I think that they will probably even have reached our friends in the US and Asia by now.
This article relates to legal matters on GDPR and are based on my personal interpretations and are not to be viewed as legal advice.
One interesting thing that has to be considered in relation to GDPR is how to handle personal information in non-production environments/instances. Microsoft have made it painfully easy with the instance manager to be able to copy the production instance but do you really have the right to use your customers personal information in a development, UAT or staging environment? Do you have legal support for that? I think that would be a very hard argument to make? Have you gotten your customers explicit consent for using their personal data for that purpose? Probably not. Hence, if you are planning on keeping the instance/environment for more than 30 days, you will need to remove all personal information from to stay within the boundaries of GDPR. I have found that using SSIS with Kingswaysoft and the Anonymization component in the productivity toolkit is very useful. I will in this rather lenghty article describe how I have used it to set up an anoymization script.
First of all you need to download SSDT and Kingswaysoft Dynamics 365 and Productivity Packs
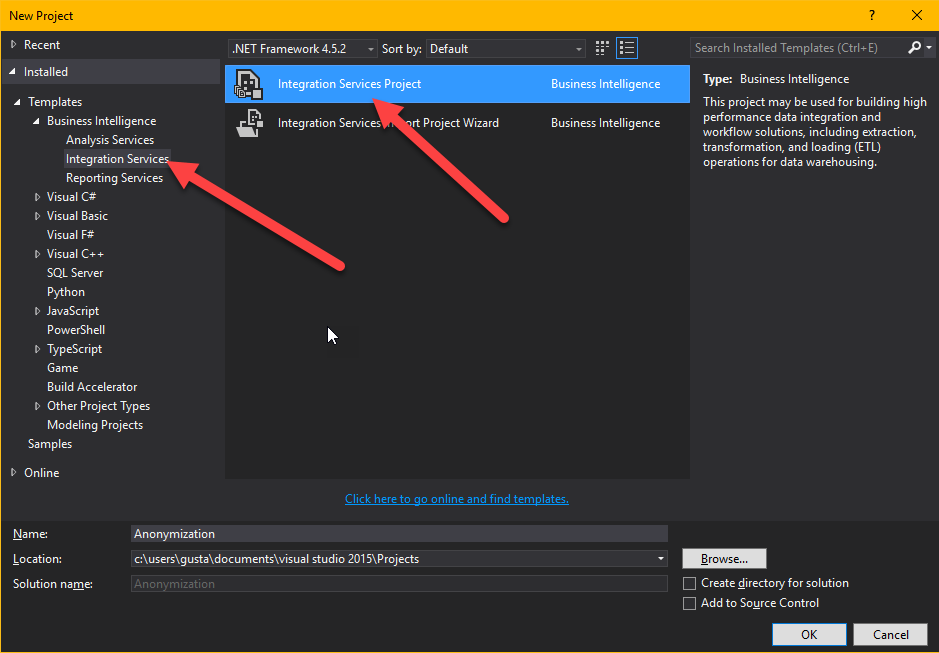
Then start a new Business Intelligence -> Integrations Services project.
Then start by right clicking in the empty field at the bottom where it says “Connection managers” and choose “New connection…”
In the dialog that shows up choose “DynamicsCRM”
You should now see a dialog showing the connection settings to Dynamics.
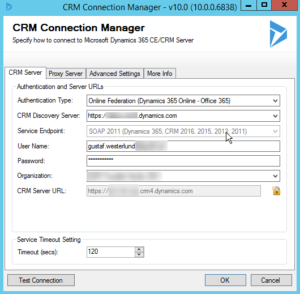 |
| Connection settings for your instance |
Choose the right settings for your instance. Test your connection at the bottom when you are done to make sure it works. Make extra sure you are not connecting to your production environment, wouldn’t want to anonymize that!
When this is done, it is time to make your first Data Flow Task. Work in SSIS is divided into two parts, Control Flow and Data Flow. The control flow is the orchestration, which tells SSIS in which order everything is to be run. If you want thing to run in parallel, just have to boxes next to each other, if you want one Data Flow to run before the other, drag the arrow from the first to the second. It is also possible to have entire “Sequence containers” which can hold several components and make sure they execute before moving to the next stage.
Let’s start by dragging one new Data Flow from the Toolbox on the left hand side to the Control Flow work pane. Then double click it. This will open it up.
You will now see that the tab at the top has changed to “Data Flow” from the previous “Control Flow”. In the “Data Flow” view you will also have a different set of toolbox components available.
In the “Data Flow” you will control a single data flow. For instance the anonymization of Contact.
Start by dragging the Dynamics CRM Source from the toolbox (on the left) to the workspace (the big pane in the middle. Then double click it. – Before looking at the details of the source component, I like using FetchXML when building queries and of course the best way to build queries with FetchXML is using FetchXMLBuilder in XrmToolBox (thanks Jonas Rapp and Tanguy Touzard for all your work!) but if that is too much heavy lifting (it really isn’t), the easiest way to get a FetchXML query is to make an advance find query and export it with the “Download FetchXML” button in the top right hand side of the ribbon of the Advanced Find query builder. So let’s say we have decided the following fields in Contact are personal information and need to be anonymized:
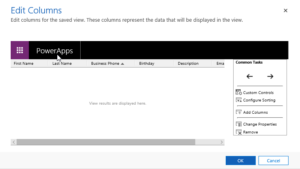 |
| The column editor in advaced find – don’t use composite fields like “fullname” or Address1 |
Downloading the FetchXml, and setting the Source component in SSDT (Visual Studio) will make it look like this:
I have set the “Connection Manager” to “Target” as we are using the same source and target (reading and writing to the same system.
I am leaving batch size as 2000. Seems to work well. Don’t reduce it too much, remember the API limit of 60 000 calls per 5 min period.
If you would like to try it a bit, you can set the “Max rows returned” to for instance “10” and then try it out a bit to see that it isn’t going crazy.
Source type I like as FetchXML – remember that you can have FetchXMLs with data from several entities which can make queries a lot easier than trying to match the data with lookups in SSIS.
I always try to read all data in UTC and write it in UTC which in most cases makes it correct. But make sure you understand how timezones work if you need to fiddle with this.
Also, don’t include more columns than you need. It will just make your script slow. After adding the FetchXML or changing it, it will try to parse it and read the meta data from Dyn365/CRM. Hence there might be a slight delay. You can check what data you will output from this component by clicking on “Columns” on the left hand side.
When done, press “OK” to go back to the “Data Flow” pane.
Now add a “Data anonymization” component and drag the arrow from the Source component to the Anonymizer. Then double click the anoymizer.
You should see something like this, where I have set anonymization settings for the different columns. By default it will say “Ignore” on all columns.
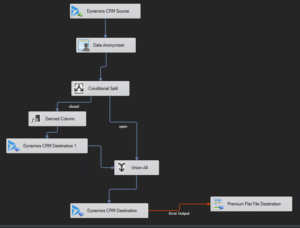
Try out the different anonymization types. Some are more generic than others. When done, click Ok and go back the data flow pane. Add a Dynamics CRM Destination and drag the blue arrow from the anonymizer (blue arrows are the normal data output, red arrows are error output) to the Dynamics CRM Destination component. Then double click it. The view in the data flow should look something like the picture below.
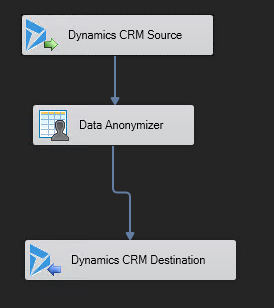 |
| Dyn365 Soruce -> anoymizer -> writing to Dyn365 |
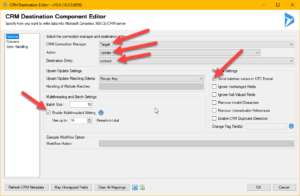 |
| Dyn365 destination component – set values where the arrows are |
When setting up the destination component, there are a few things to consider:
- In this case we are always doing updates – hence set the action to update. It is faster than upsert.
- You have to set the Destination Entity.
- If you write data to Dyn365 with high latency, no batching and no threads you will be able to update at about 2-3 records per second. With low latency, correct batch setting and multi threading, I have been able to get up to 300 records per second. Very dependant on entity. Hold the mouse of the blue “i” just after the “Enable Multithread Writing” for some deep end tips from the scholars at Kingswaysoft.
- Error handling is recommended to be directed at a file or some other output where you can monitor it. If you do nothing about it, and you get an error, it will break the flow and stop. You can control error handling of the destination component by clicking on the “Error handling” tab on the left hand side. Remember that all types of exceptions thrown by Dyn365 you will get here as well, like missing rights, disabled records etc.
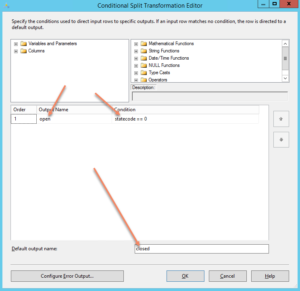 |
| This is how the conditional split is defined – if statecode is 0, send them to the output called “open” otherwise send them to the output called closed |
Then you can test run your data flow, by right clicking the data flow pane, and pressing “Execute Task”
And when you have assemble an larger control flow – like for instance this:
 |
| A control flow with several dataflow being disabled – all in sequence. |
you can execute the entire flow by clicking the green plus sign in the ribbon.
Gustaf Westerlund
MVP, Founder and Principal Consultant at CRM-konsulterna AB
www.crmkonsulterna.se




Recent Comments