Recently two new features were introduced to dataverse that allows us to better manage customer addresses. A few years ago (2012) I wrote an article on the subject (https://community.dynamics.com/blogs/post/?postid=b889a366-d3fb-4b39-bdb9-7f3716283d4c) which goes into some detail about how the customeraddress table works. This post will revisit some of that and also discuss how the two new features regarding the customeraddress can help us better manage our data.
To make this a bit shorter, the addresses of accounts and contacts are not stored in these tables but actually in a special table called customeraddress. This is hidden to most user operations but it does show up in some cases, for instance in storage calculations in PPAC. The same goes for the lead table which has a special leadaddress table that supports that.
With the default settings, for every account, you will get 2 customer addresses, and for every contact you will get 3 customer addresses. Lead has two addresses and hece will have two records of lead addresses.
This can start becoming an issue if you have lots of these base records, contact, account or leads, which are more or less empty. So even if there is no address data on these records, they will still have these supporting records and all records in dataverse will take up some storage, based on the fact that there are some fields that always are created like modifiedon, createdon, modifiedby etc. Typical scenario where this can start becoming an issue is if you are using dataverse for marketing and you have several million leads to whom you send newsletters but don’t really know that much more about them. With 1 million leads, you will get 2 million empty lead addresses.
So, what is new? The new functionality Microsoft have released are two features. The first feature is that the customeraddress or leadaddress records are not created until there is actually information that needs to be stored in these records. This is generally a good setting to be set to true, as storing more or less empty records isn’t really very useful.
If you have an existing system with 2 million contacts and 4 million leads, this will however not remove the existing customeraddresses (6 million) and leadaddresses (8 million) that are empty. For this, there is the second new feature which allows you to remove customeraddresses without removing the contact/account/lead. There is, of course a workaroud for this, and that is to create a new contact/account/lead with the first feature switched on, hence not creating any address records, and then merging this record with the old one and finally removing the old deactivated records. It is, however, much easier to solve it with just removing the address records.
Before running anything like this, make sure you make a forced backup of your instance. I have seen onprem systems where there are lacking address records and that is just very very weird.
Hope this helps explaing a bit about how this functionality works.
Many organizations, especially banks, insurance companies and other organizations that value trust highly are very careful about how links are formatted in emails that are being sent out. The key is that links need to be “safe” which in essence means they need to have the correct domain. For example company Contoso, this means that the domain needs to end with “contoso.com” and could for instance be “forms.contoso.com” or something similar. However, there is currently no way to create “branded” links in CI-J and this feature was deprioritized and removed from Release wave 2 2024. I (and a some customers of mine) are hoping it will be coming soon. In the meantime, I have been considering what options there are. Here is one, with a simple webpage that just redirects to some other webpage based on some parameters.
<!DOCTYPE html>
<html lang="en">
<head>
<meta charset="UTF-8">
<meta name="viewport" content="width=device-width, initial-scale=1.0">
<title>Redirecting...</title>
<!--
This webpage will redirect the browser to the url indicated in the query string paramater "url", forward all other query string parameters
and also track the webusage in Dynamics 365 CIJ
Ex. url (file located in c:\temp): file:///C:/temp/redirect.html?url=https%3A//skandia.se¶m1=value1¶m2=value2
-->
<script>
// Function to get query string parameters
function getQueryParam(name) {
const urlParams = new URLSearchParams(window.location.search);
return urlParams.get(name);
}
// Function to get all query string parameters except 'url'
function getOtherQueryParams() {
const urlParams = new URLSearchParams(window.location.search);
let params = [];
urlParams.forEach((value, key) => {
if (key !== 'url') {
params.push(`${key}=${encodeURIComponent(value)}`);
}
});
return params.join('&');
}
// Redirect to the URL specified in the 'url' query parameter
window.onload = function () {
const targetUrl = getQueryParam('url');
if (targetUrl) {
// Basic validation to ensure it's a valid URL
try {
const validatedUrl = new URL(targetUrl);
// Get other query parameters and append them to the target URL
const otherParams = getOtherQueryParams();
if (otherParams) {
validatedUrl.search = validatedUrl.search ? validatedUrl.search + '&' + otherParams : '?' + otherParams;
}
// Perform the redirect
window.location.href = validatedUrl.href;
} catch (e) {
console.error('Invalid URL:', targetUrl);
document.body.innerHTML = '<h1>Invalid URL</h1><p>Please provide a valid URL as a query parameter.</p>';
}
} else {
document.body.innerHTML = '<h1>No URL Provided</h1><p>Add a "url" query parameter to redirect.</p>';
}
}
</script>
</head>
<body>
<p>Redirecting...</p>
</body>
</html>
The code simply parses the parameter url and redirects to this url including all other query string parameters. This is important as that will maintain any UTM tags that were added.
The point is hence to place this webpage on any page internally at the company, for ex. https://contoso.com/redirect.html and then call it with the parameters indicated like https://contoso.com/redirect.html?url=https%3A//crmkonsulterna.se¶m1=value1¶m2=value2
In CI-J this means that you either manually have to assemble these url:s or create some function, preferably connected to the ribbon to easier be able to add this redirect url to the email.
Tracking
As we need to make sure that the URL is not using the built in tracking in CI-J, using the normal button functionality of “Tracking” needs to be switched off, as the tracking functionality uses Microsoft redirect pages and hence break the typical “no link outside our domains”-policy.
We do need to track anyway and there are two ways that I can see that off the top of my head will achieve this:
Using webtracking
Using custom triggers
Webtracking is, at the time of writing this article, a preview functionality, and we might hence be a bit hesitant in trying it out. If you want to, there is a setting switch for it under settings in CI-J. Then reload the page and click on “Web tracking” to get the correct script.
Custom triggers has been around a while and is probably easier to use. Create a custom trigger and get the code snippet for it and add it to the redirect-page. Every time someone hits the redirect page the custom trigger will be called. When using triggers, I would recommend using parameters to forward all relevant data to the journey where you want it.
I hope this helps you or gives you inspiration on how to do something similar!
In a previous post I blogged about how to break down the Form script that was exported from CI-J (Real Time). As some customers asked me about making this into a script that was the same and was dynamic based on query string parameters (parameters in the URL), I worked a bit on that and thought I’d share it here;
A few things that can be mentioned. This script expects that there will be two query string parameters: id – the id of the form. Click on the form and copy it from the URL after the “id=” orgid = the orgid which you can find in the PPAC or in the export of the script as I described in the previous article. If it is placed on the url: https://contoso.com/form.html then an example of the url would be:
Finally some organizations also have problems with loading a script from external sources. I will look at that too. Mainly there are two option. Copy-paste the entire script inline into this script or copy the script file to an “internal” or recognized store with a public URL and change the src-attribute. If you move this away from referencing Microsoft, I would recommend checking their website on a regular basis to make sure it hasn’t changed.
I have recently been working with a customer with a large (500+ GB dataverse db) production instance and we are attempting to cut this down quite a lot. The natural way of doing this is bulk delete but it seems that if the underlying SQL isn’t up to speed, your jobs might end without actually being done.
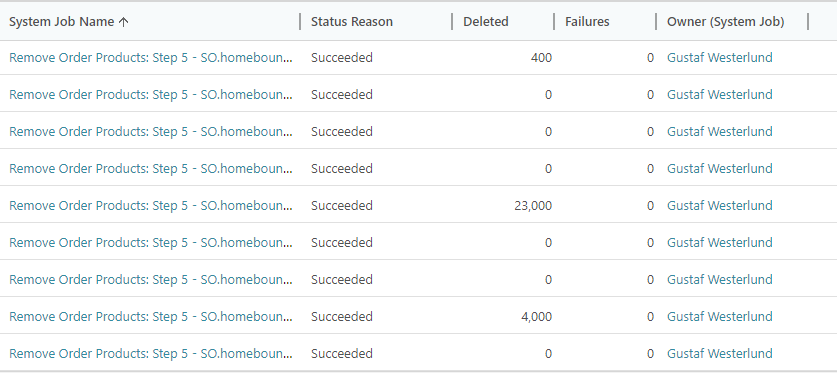
My customer has a production instance of over 500GB which is costing them some substantial money and hence we started looking at removing some of the less necessary data. In this case it was the order products (salesorderdetail) which we have perceived that we do not need more than one year after delivery. Hence we set up an advanced find, agreed on the exact filters, saved the view and then tried to remove the records (well over 5M) using bulk delete. I restarted it several times. You can see the chronological results in the screenshot below:
As you can see, sometimes it actually deleted a few records, but most times, it didn’t. My professional analysis of this (=guess) is that this is caused by bulk delete not handling exceptions like SQL Timeout properly or that it has a limit on the number of times it will retry.
I also, in parallell tried to remove the same records with the same FetchXML using SSIS/Kingswaysoft and here I have several times gotten this error. I have had to turn down the knobs to a very low setting to get it to work, but the error message I did get was:
(Status Reason: ServiceUnavailable): The remote server returned an error: (503) Server Unavailable.”.
As you can see, there is a lot of noise but it clearly, in the highlighted part, say that there is a SQL Timeout.
Hence my takeaway from this is that you need to be a bit wary of bulk delete in large instances or in general as it might indicate that it has completed successfully but in fact it stopped due to SQL Timeout (or some other platform related issue).
On a personal note, I really hope the bulk delete functionality gets a modernized revamp soon. It is really old and is becoming more and more relevant.
Recently I needed to get the marketing insight replicated data from the data lake where it is replicated to, to Customer Insight. However, that turned out to not be very easy as the data had some formatting issues. However, I found that the Marketing reports that Microsoft have release for Power BI can be used as inspiration for how to query the data.
I am currently working on a rather long Proof of concept of Customer Insight for a customers. One of the things they wanted to see if it worked to get into Customer Insight was EmailClicked which is part of the Marketing Insight data that Marketing stores in an internal database. This can rather easily be replicated to an external datalake, with some configuration in the admin tab in Marketing. However, when I tried to connect to that data, using the Azure Datalake gen2 adapter in Customer Insight, it consistently said that there was no data. After some digging I found that the main reason for this was that the files in the datalake did not have the propper file-ending for the datalake connector to understand them. In short, they are csv-files, but do not have the filename xyz.csv. Simple enought problem, I thought but as I am not super comfortable working with datalake data, I tried to figure out some way of easier solving this issue. First I tried using the dataflow connector to ADLS gen 2 but that got the same problem. Just so you know.
Then it struck me, data flows use PowerQuery/M which is the same thing that is used in Power BI, AND Microsoft have release some marketing reports for Power BI that utilize the data in the datalake combined with dataverse. I hence opened one of these and tried to copy the entire data query part. It turned out to be more than 20 different components. Datasources, configuration, functions and more. When pasted into the Data Flow, it simply didn’t work and as usual, I didn’t get a very good errormessage. But my hunch was that maybe the logic is too complicated with too many internal connections for the data flow. If you know the limitations here, please leave a comment. This didn’t stop me, my next step was to remove all unnecessary stuff from it, like the dataverse queries, config and such, but still, it didn’t work. So I attempted to move it all into one single M-script with a hardcoded referece to EmailClicked. When I did that, it worked! This is the final result:
let

    Source = AzureStorage.Blobs("<datalakename>"),
    #"ContainerContent" = Source{[Name="<containername>"]}[Data],
    #"Removed Other Columns" = Table.SelectColumns(ContainerContent,{"Content", "Name", "Date modified", "Attributes"}),
    #"Filtered Rows" = Table.SelectRows(#"Removed Other Columns", each [Name] <> "model.json"),
    #"Sorted Rows" = Table.Sort(#"Filtered Rows",{{"Date modified", Order.Descending}}),
    #"Expanded Attributes" = Table.ExpandRecordColumn(#"Sorted Rows", "Attributes", {"Size"}, {"Size"}),
    #"File Name column" = Table.DuplicateColumn(#"Expanded Attributes", "Name", "File Name"),
    #"Remove csv" = Table.ReplaceValue(#"File Name column","csv/","",Replacer.ReplaceText,{"File Name"}),
    #"Split Column by Delimiter" = Table.SplitColumn(#"Remove csv", "File Name", Splitter.SplitTextByEachDelimiter({"/"}, QuoteStyle.Csv, true), {"Interaction Name", "File Name"}),
    #"Transform" = Table.TransformColumnTypes(#"Split Column by Delimiter",{{"Interaction Name", type text}, {"File Name", type text}, {"Size", Int64.Type}}),
    #"Add Datestamp" = Table.DuplicateColumn(#"Transform", "Date modified", "Datestamp"),
    #"DateStampFormat" = Table.TransformColumnTypes(#"Add Datestamp",{{"Datestamp", type date}}),
    TodayFunction = DateTime.FixedLocalNow,
    #"Add Today" = Table.AddColumn(#"DateStampFormat", "Today", each TodayFunction()),
    #"Changed TodayType" = Table.TransformColumnTypes(#"Add Today",{{"Today", type date}}),
    #"Add DaysFromToday" = Table.AddColumn(#"Changed TodayType", "DaysFromToday", each [Datestamp]-[Today]),
    #"Changed DaysFromToday" = Table.TransformColumnTypes(#"Add DaysFromToday",{{"DaysFromToday", Int64.Type}}),
    Result = Table.RemoveColumns(#"Changed DaysFromToday", "Today"),
  result2 = Table.SelectRows(Result, each [DaysFromToday] >= -180),
  FilteredByInteraction = Table.SelectRows(result2, each [Interaction Name] = "EmailClicked"),
  #"AddFileContents" = Table.AddColumn(#"FilteredByInteraction", "FileContent", each
    Table.PromoteHeaders(Csv.Document([Content],[Delimiter=",", Encoding=1252, QuoteStyle=QuoteStyle.Csv]), [PromoteAllScalars=true])),
  #"ContentTable" = Table.SelectColumns(AddFileContents,{"FileContent"}),
  #"NoDataFiles" = Table.IsEmpty(#"ContentTable"),
  InteractionTable = Table.ExpandTableColumn(#"ContentTable", "FileContent", Table.ColumnNames(ContentTable{0}[FileContent])),
  #"Transformed" = Table.TransformColumnTypes(InteractionTable,{{"Timestamp", type datetimezone}}, "en-US"),
  #"Duplicated Column" = Table.DuplicateColumn(#"Transformed", "Timestamp", "Datestamp"),
  #"Datestamp" = Table.TransformColumns(#"Duplicated Column",{{"Datestamp", DateTime.Date, type date}}),
  #"RenameId" = Table.RenameColumns(#"Datestamp",{{"InternalMarketingInteractionId", "Id"}}),
  #"keyedtable" = Table.AddKey(#"RenameId", {"Id"}, true)
in
  #"keyedtable"
I have highlighted the datalake name, container and the table. I hope this helps if you are having a similar issue!


Recent Comments