Fast data management in a limited CDS world

Fast data management in a limited CDS world

In May 2019 Dynamics 365 CE/CDS enacted some new throttling mechanisms that have caused some headaches for anyone wanting to manage a lot of data in CDS (I will refer to Dynamics 365/CDS as just CDS below). There are several different throttles but the one that has cause me most trouble is the concurrency throttle. Kingswaysoft will release support for handling this in the next release and you can also request a special version from them if you ask nicely. In the meanwhile this post can give you some help on how to work as fast as possible using application user mulitplexing and a loop with a 5 min wait to make sure that the throttles are reset.

The new throttling on the main CDS API, as described here: https://docs.microsoft.com/en-us/dynamics365/customer-engagement/developer/api-limits needs to be carefully considered when doing heavy data manipulations in the CDS. One of my customers has a large system with numerous integrations of which the most data heavy are the Marketing Automation systems and the booking systems. And yes, this is Business to consumer.

With the new per GB pricing, keeping the database as small as possible has become an essential task and using the bulk delete just doesn’t work for large data loads, at the time of writing this article. I do hope that Microsoft increase the speed of it so that it does become more useful but currently its speed is somewhere around 1-2 records per second.

The bulk delete also has limitations on that it can only base it selections on a query, i.e. a FetchXML. Often this is not enough, for instance when you want to remove “All emails except those that have any connection to either a case or a contact which has a case”.

For these reasons I almost always opt for using SSIS with Kingswaysoft connectors to CDS when working with complex data management. This article will be on how to get some performance now that there is tougher throttling to take into consideration.

User multiplexing

As the throttling is measured on a “per user”, one trick is of course to use multiple users and spread the load over all these users. You can, of course use normal users, but that will cost you licenses so the smart person will of course use application users instead. If you don’t know how to create application users in Dynamics 365, check it out here: https://docs.microsoft.com/en-us/dynamics365/customer-engagement/admin/create-users-assign-online-security-roles#create-an-application-user . In the example below, I will be using four different application users, one as the source account and three as destinations. The reason for this is that it is typically easier to read several thousand rows per request, but seldom efficient to do batch creates/writes/deletes of more than 10-20.

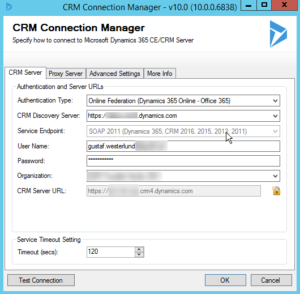
To do this with SSIS/Kingswaysoft you should start by setting up the connections. In this case, the four CDS/CRM connections and use the OAuth auth-type like below. 
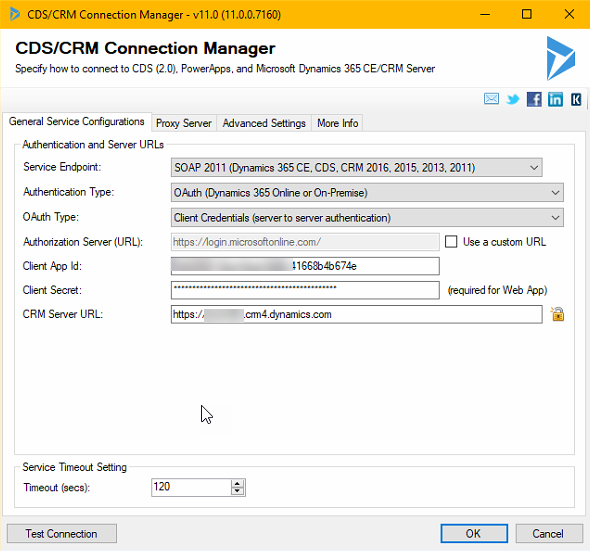
As you might want to have several packages in the same project and have them share the connections, it may be a good idea to use project connections. I also use an Azure SQL db for logging any errors. Previously I used to use CDS but now with the throttling, that is not such a good idea as the error itself might be throttling and hence the error can cause an error. Writing to some target that you know will not fail is hence a good idea for logging errors. When you are done with the connections, it should look something like this:

Now it is time to build the actual flow. If you’d normally have a Source and a Target, it will now look something like the image below, which I will explain.
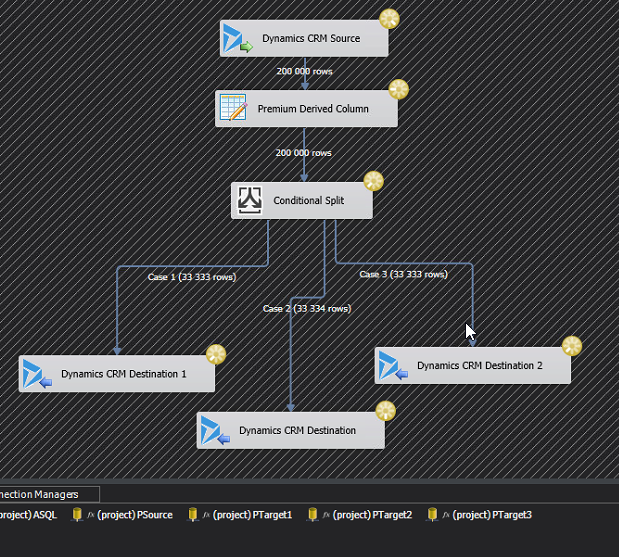
First of all, the Premium Derived Column creates a new column which simply contains the row number. It will look something like this: 

I like to use the components that are available in the Productivity pack from Kingswaysoft, and this Premium Derived Column is one of these. In this case I think it is actually equal if you use IncrementalValue() or RowIndex(). I think you can create this logic with a normal Derived Column too, it just has less features.

Next we need to create a Conditional split that divides the rows evenly between the three destination components. This is done using the mathematical operator modulus which is written using the “%”-sign. For those that didn’t study this in school, it simple means “the rest” in a division. For instance 5%3=2, if you divide 5 by 3 you will get 1 and a rest of 2. What we will do, is assign RowNr%3 == 0 to Case 1, RowNr%3 == 1 to Case 2 and the rest to Case 3. That should divide them evenly. It looks like this: 
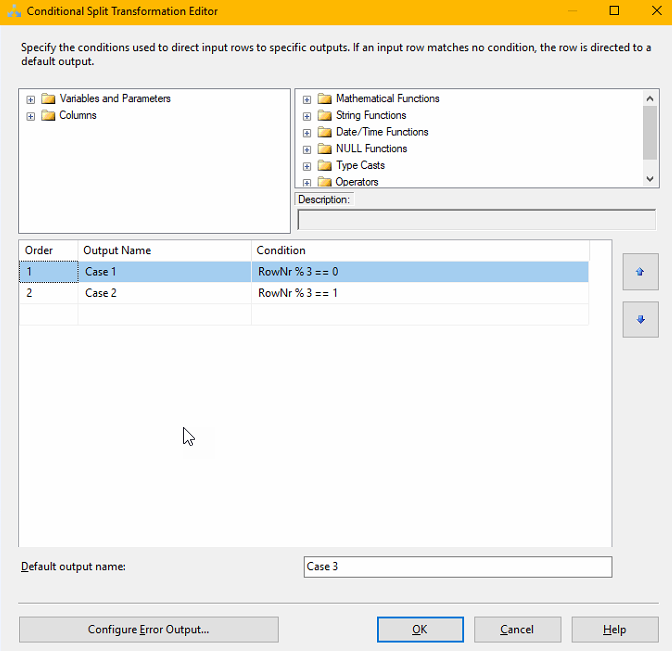
You then create the three destination components. I typically create one first, copy it and change it, as that is faster. Make sure that you set the Connection Manager to the three different Target Connections.

I also recommend that you fiddle a bit with the batch size and the number of threads and test out which gives the best results for you and the entity and action you are working on. There is no one answer here. I would typically start at Batch 10, Threads 16.

Tuning DataFlow property settings

If you back out to the Control Flow view and right click on the Data Flow you have created, there are some other interesting setting you can twirk.

DefaultBufferMaxRows – 10 000

DefaultBufferSize – 10 485 760 (10MB)

EngineThreads – 10

These can also be tuned to allow for the Data Flow to handle more rows, more memory and use more parallell threads which of course will make it faster (if that is the bottle neck, typically not when working with Dynamics)

What I have found is changing the maxrows to 100k, the buffer size to 100 MB and engine threads to 32 will not hurt but you can find several other blog articles specializing in SSIS that discuss this.
Crude throttle handler

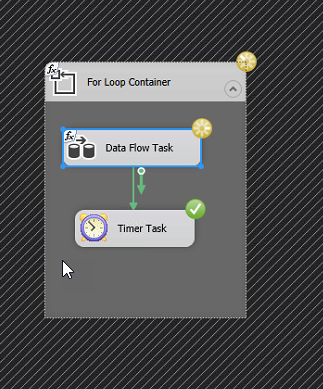
What I have noticed is that many of my Dataflows simple seem to grind to a halt after 400-600k rows read from Dynamics. Not sure if it the read or write part that is causing this but what I figured is that probably the most pragmatic way of solving this would be to create a loop that runs a data flow that is limited in the number of records, typically 400k, wait 5 minutes then iterate. Smartest version is of course to have a control variable which checks to see when when there are no more rows and then breaks the loop, simpler version is to just loop n number of times to cover the amount of data you are trying to move, ie. number of rows per iteration x number of iterations. It would look something like the picture to the left.

If you would like to refine the loop a bit to make it more automatic, create a variable of type Int, for instance RowCount, set the initial value to be 10 or something different from 0. Then set the EvalExpression to “@RowCount > 0”. After this add a RowCounter control to the Data Flow and connect this to the variable RowCount. When the Data Flow runs and returns 0 rows, it will run to the end, the EvalExpression will evaluate to “False” which will cause it to break.

Using this technique, I am able to remove several million records in just a few hours. With one of these jobs I managed to remove 20 GB of structured data in less than two days (no attachments or similar, just records). By adding more application accounts and of course both to the source and particulary to the destination side, you can increase the speeds you are getting.

I do also advise you to be on the lookout for Kingswaysofts new version which I think will come soon, and do as I, make sure to always download both the Dynamics and Productivity Pack. I have read that there are great things coming to the productivity pack!

How to reduce SubscriptionTrackingDeletedObject table in CDS/Dynamics 365 – Updated!

How to reduce SubscriptionTrackingDeletedObject table in CDS/Dynamics 365 – Updated!

One of my customers is a B2C customer with a very large online database exceeding 500 GB. With a very active Marketing automation tool interated, we generate a lot of data in Dynamics 365 CE which after defined retention periods needs to be removed. This has caused some side effects, that a table called SubscriptionTrackingDeletedObject has become very large. This article will describe how to set a configuration to reduce its size. UPDATED – Based on some new learning and information from Microsoft this article has now been updated!

We often monitor the Organizational Insights, and now lately the brand new capacity feature that can be found in the left hand menu in https://admin.powerplatform.microsoft.com, if you have a CDS/Dynamics 365 CE instance.

An interesting table started growing rapidly and we had no clue what this was, and I had during my now 15 years of working with Dynamics 365 never seen it. It was called SubscriptionTrackingDeletedObject. When I came back from my Swedish summer vaccation, it had grow to over an amazing 181M records. Time to fix this.

First thing, as usual is of course to google it (yes, it is a verb, get used to it). All I found was this somewhat informative post by my good friend Chris Cognetta who is an ace with infrastructure issues.

http://cognettacloud.net/2016/06/21/crm-database-log-growth-issue/ 

However, it seemed that they just truncated the table, and we were online so that was a bit tricky, to say the least. I was at this time a bit upset that Microsoft were taking up around 50GB of space for my customer without giving me any way of managing that, or having any direct use of it. I counted to ten and called Microsoft Support.

After a few emails back and forth, the excellent support technician at Microsoft informed me that there is actually a setting in the infamous super secret setting tool with the Star Trek-sounding name OrgDBOrg (it is pronounced “Org-D-Borg” in case you ever get stuck in Dynamics trivia). The setting is called ExpireSubscriptionsInDays. I will quote the support technician in what this table is used for and if anyone has any more information, please leave a comment.

“The SubscriptionTrackingDeletedObject table is the table that logs records for number of days before deleting inactive subscriptions as well as timed out deletion services.”

I am not sure for which purpose. If it is in regards to GDPR or some restore mechanism. I would like to know though. Default value for this i 90, which means that these logs will be stored for 90 days. The minimum they can be set to is 1. As I am currently not entirely sure what these logs are used for, I would not recommend you set them to 1, but I did set my customers to 5, hoping that this is not going to come back with a vengance.

We have during the day seen a dramatic drop in the amount of records in this table, with about 30M but and it is still ongoing, but hard to measure as there is a delay in the capacity measurement the Powerplatform admin portal.

Update! The size of the table fell to 160M rows but never below this so after some further discussions with Microsoft support they did some more investigation into this subject and came back with the following recommendation:

1. Reduce the value gradually from 90 to 60 and then on
2. Never go below 15

There is however, another related setting called ExpireChangeTrackingInDays which is located just next to the ExpireSubscriptionsInDays. This is defaulted to 30. We reduced this to 15. 

Based on these recommendations we tried 60 days and this resulted in a most dramatic drop to around 20M rows. – End of update


So, how do you do this? First, download the OrgDbOrgSettings tool and install it in the instance where you are having issues. Check out these links below for that:

https://github.com/seanmcne/OrgDbOrgSettings/blob/master/readme.md

https://github.com/seanmcne/OrgDbOrgSettings/releases

A word of advice regarding OrgDbOrg; don’t think that you are Captain Kirk and go flying off into the Beta Quadrant and beam every single setting just because you can. It won’t make your system better, rather the opposite. Make really sure on what you are doing and don’t even trust a blog article like this, read the KB-article linked in the tool and make up your own mind. It is a powerful tool, like a jackhammer.

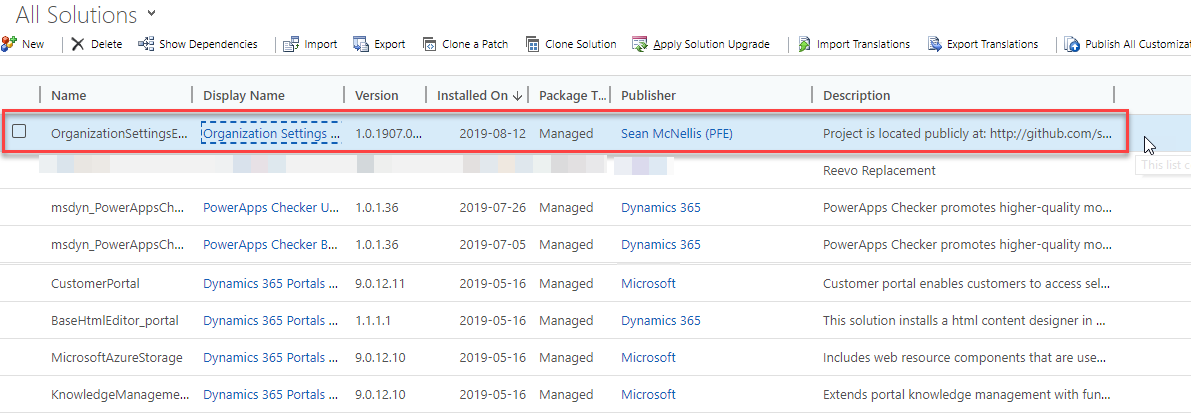
After you have installed the OrgDbOrgSettings tool, you can see it and open it by clicking the display name.

Then just find the “ExpireSubscriptionsInDays” – Press “Edit” and change to whatever you would like it to be. You will typically have to confirm to save it to Dynamics 365 CE/CDS

With that done you should just have to wait for the magic to be done.

As far as I have understood these two settings and this table is used to indicate how long changes and deletes are stored in this table and related tables for integrating systems to be able to read. This can, for example be Data Export Service, the old Dynamics for Outlook client etc. Hence reducing the numbers to, for instance 15 (the lowest recommended number by Microsoft) can result in some changes not being propageted to these integrated systems in the case that the integrations or just an offline client being offline for more than 15 days. And I also got the feeling that setting it to 5 was below some internal threashold and hence wasn’t really supported despite the fact that it says in OrgDBOrg that the lowest value is 1.

TCP Chimney

TCP Chimney

Today I was working with a customer and we have had some weird SSIS intermittent errors where the Native OLE DB / SQL Client was giving me some trouble with really weird errors.

Errors like these:

CRM service call returned an error: CRM service call returned an error: The request channel timed out while waiting for a reply after 00:01:59.9990005. Increase the timeout value passed to the call to Request or increase the SendTimeout value on the Binding. The time allotted to this operation may have been a portion of a longer timeout. (Error Type / Reason: Timeout)

[OLE DB Destination [611]] Error: SSIS Error Code DTS_E_OLEDBERROR. An OLE DB error has occurred. Error code: 0x80004005.
An OLE DB record is available. Source: “Microsoft SQL Server Native Client 11.0” Hresult: 0x80004005 Description: “Communication link failure”.
An OLE DB record is available. Source: “Microsoft SQL Server Native Client 11.0” Hresult: 0x80004005 Description: “TCP Provider: An existing connection was forcibly closed by the remote host.

After some searching and troubleshooting, I found the following blog which finally seemed to address the error at hand. When I tried removing the “TCP Chimney” , it the error went away. Please read more about it here:

TCP Chimney Setting and SQL Server Error: TCP Provider: An existing connection was forcibly closed by the remote host

SSIS and Kingswaysoft are great tools but sometimes the errors are really tricky and you have to be rather persistant to fint the root cause. In this case it seems to be related to the NIC.


Server Side Sync with Forward mailbox and SMTP

Server Side Sync with Forward mailbox and SMTP

Most often when setting up server side sync, especially in Online environments, Dynamics 365 CE/CDS is connected to Exchange Online. This is rather straight forward. Even in less straight forward cases like On-prem to On-prem or the so called hybrid cases of on-line to on-prem where the involved parties are Microsoft Dynamics 365 and Exchange in some manner are all rather well documented and might be a bit tricky but generally there are some good instructions for how to get it working. Like for instance this. However, if your setups require more complex email management then the documentation and blogs around the Internet start getting a lot sparser. This article will detail a complex setup with Server Side Sync using Forward Mailbox to a proxy O365 exchange account and outgoing email using SMTP using the SMTP service SMTP2GO.
I recently migrated a customer with a complex setup from Email router to Server Side Sync as the Email router has been long deprecated and the indications I am getting from Microsoft are that it is hight time to start transitioning away from it to Server side Sync or to some other solution that can solve it, like for instance Riva. I will not go into the advantages of using that in this post, but generally it can be said that it has a lot more configuration options and logging options available, but at a price of course. Most of my customers try to get the Server Side Sync (SSS) to work and if this cannot be done, then other venues, like Riva or custom code are evaluated.
The background to why this complex setup was required was that my customer had their main Exchange server managed by their parent’s parent company in Germany. If you are not aware of the requirements for setting up Server Side Synchronization (SSS) from Dynamics 365 to an Exchange, it requires the use of an account using “Application Impersonation”. Asking the Exchange admins for this permission, although I have heard (I am no Exchange guru though) that is can be limited to specific users, was perceived to be practically impossible. We could, however, setup Forwarding rules with “Forward as attachment” on the public folders where the incoming emails were received.
As for outgoing email, the story was more or less the same. We could not connect to the Exchange server in Germany to send any emails. However, my customer were allowed controll over the DNS entries of the domains they worked with hence they could add SPF records to other email sending servers. When using the Email router, we had installed this on a VM hosted in Amazon Web Services and then sent email using the Amazon Simple Email Service (SES) on port 25. When we tried this with Server Side Sync, however, we noticed that we were now “outside traffic”, no longer coming from inside Amazons networks, and were hence throttled on Port 25. We tried all other possible SMTP ports for SES but nothing seemed to work with SSS.

Incoming – Forward mailbox

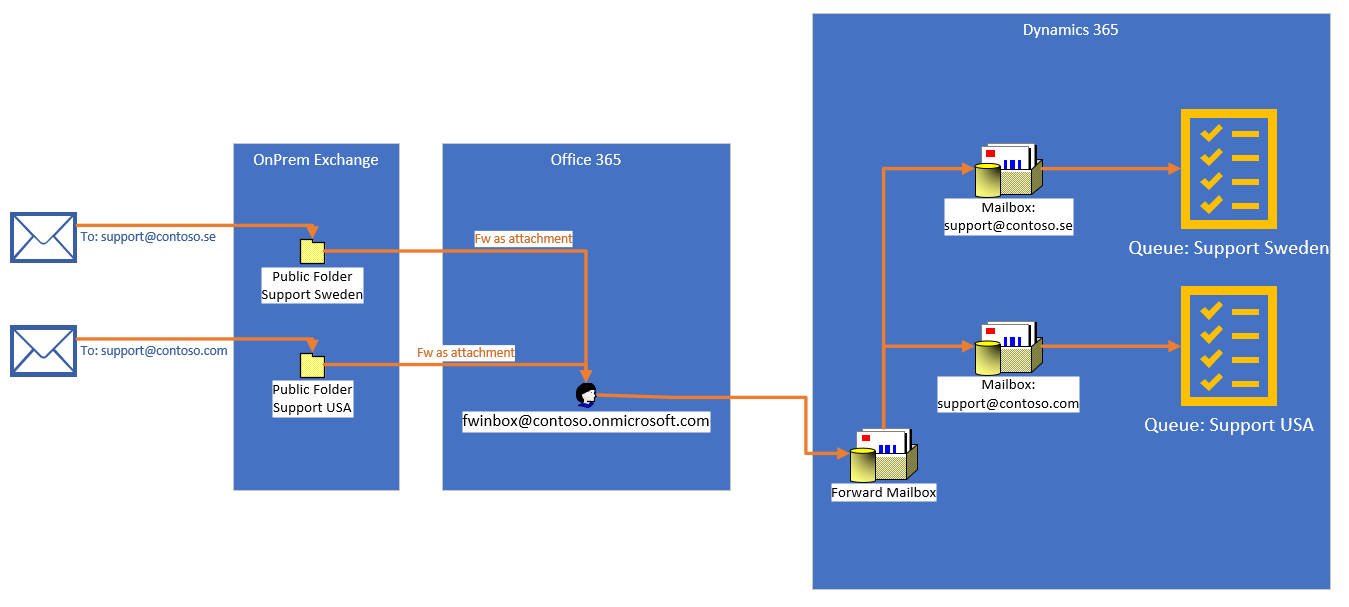
Ok, so how to solve it? Let’s start with the incoming email. As I have hinted the best method for this is to use the “Forward Mailbox” technique. This means that you set up a special mailbox, you actually create a new mailbox in Dynamics of the type Forward mailbox. This is then linked to a normal Exchange mailbox user account. It cannot be a public folder or something else. It has to be a user. You might be able to use a O365 Exchange Kiosk but be aware of the size limitations if you decide to keep the email on the server. Otherwise an E1 is probably recommended. This email address is never seen by any customer, so can be rather obscure, like forwardmailbox@contoso.onmicrosoft.com.

Rules are then set up on the onprem server to forward emails coming in to all relevant email addresses (be it users, public folders, groups or otherwise) as attachments to this forward mailbox. Why forward as attachment you might ask? The reason is that it keeps the entire header of the email intact which allows Dynamics to parse it and connect it correctly. Below is an figure discribing this incoming email flow with two queues. Typically you would have many more queues. My customer has 100+ queues.

Incoming email using forward mailbox proxied via O365

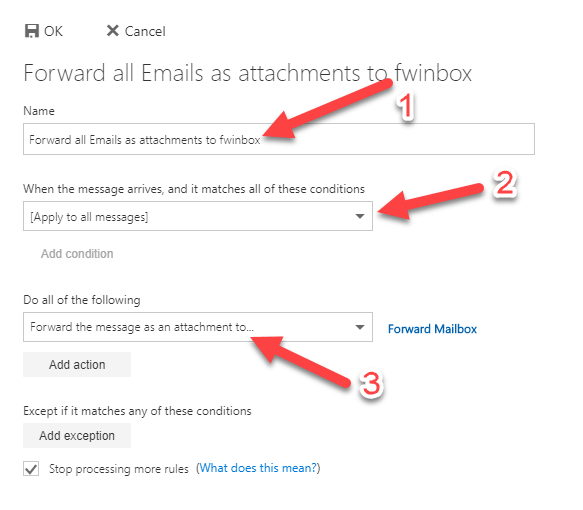
Setting up forwarding rules for “forward as attachment” is done in the following steps:

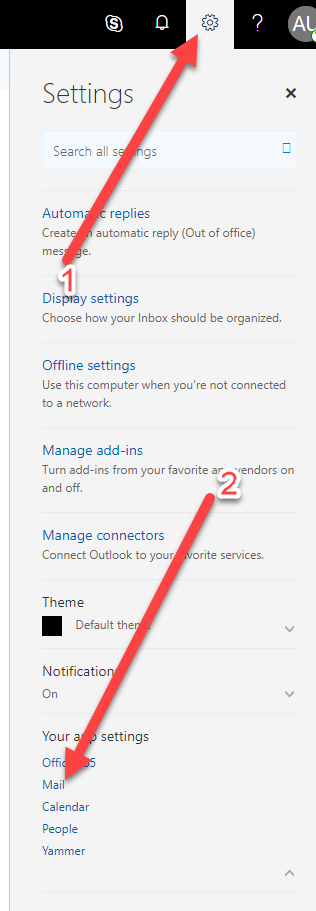
Using Outlook Web Access, click on the Settings cog (1) and then Mail (2).
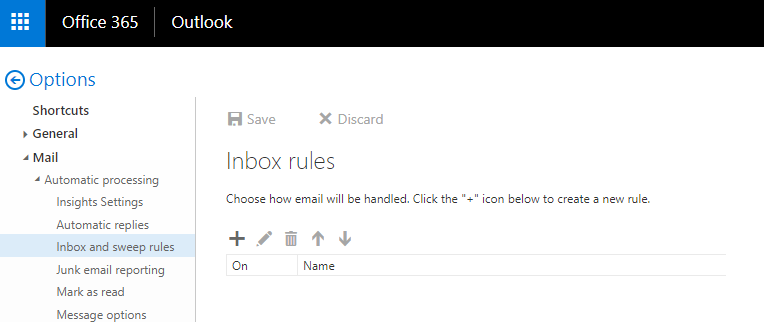
Go to Inbox and Sweep rules and press (+) to create a new.

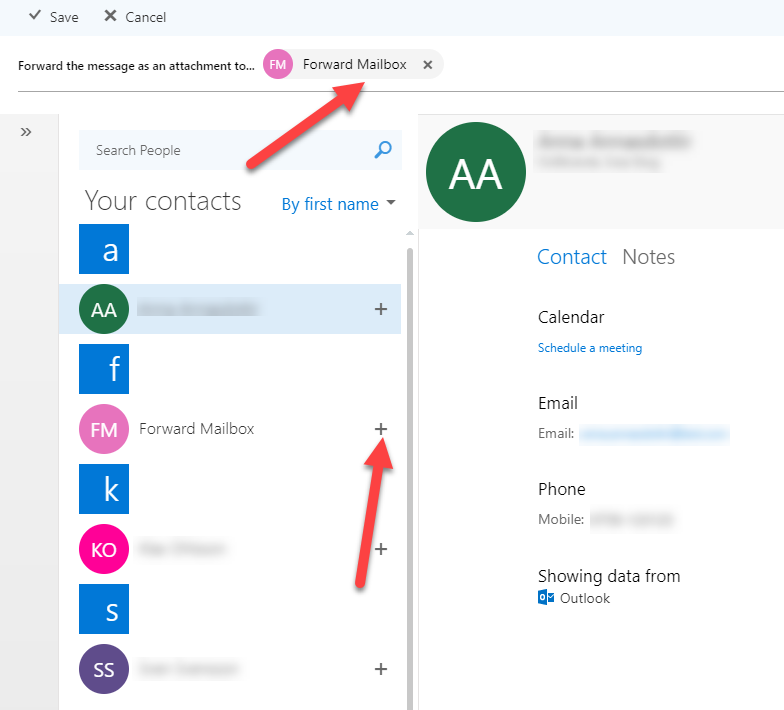
Apply it to all email (if that is what you want) and then select the action – “Forward the message as an attachment to” and select the Forward mailbox contact that either created before or do it in the next step.

This is how you create a contact (this is rather straight forward)

After this, you should have a forwarding rule which is activated and you should be able to start seeing emails landing in the forward mailbox shortly after they have arrived in the normal inbox, and with the orginal email as an attachment.

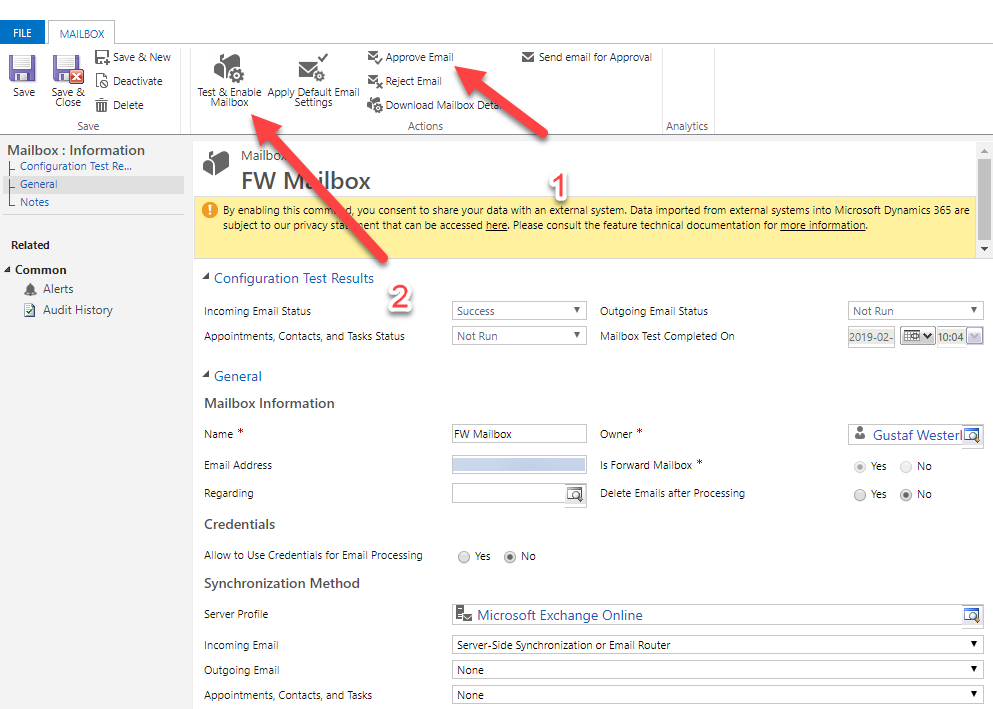
When creating the forward mailbox you have to remember to get a global admin to approve the email address (1) even if you switched this off for users or queues. You also need to “Test & Enable Mailbox” (2)

Outgoing – SMTP

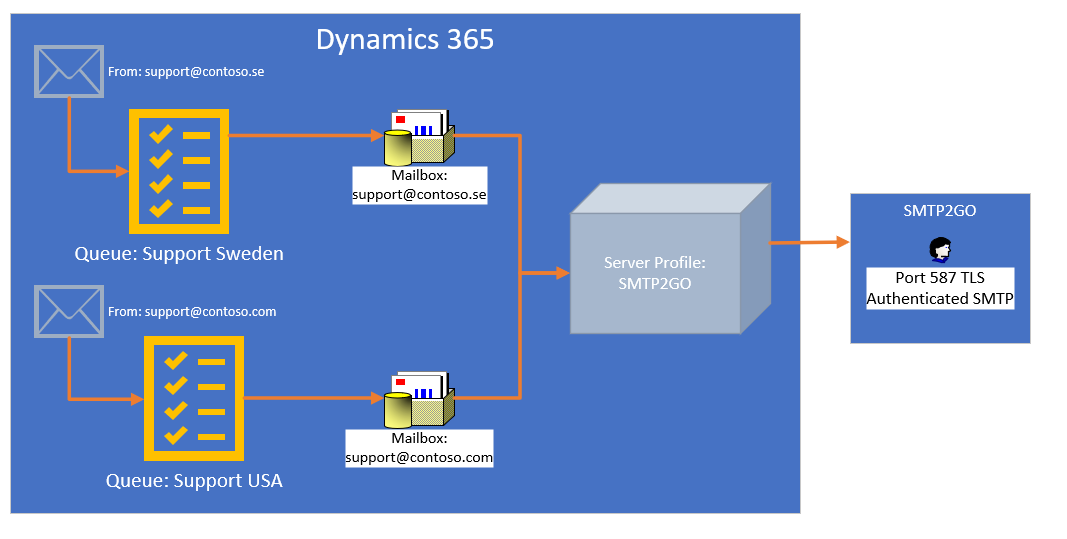
Outgoing email we solved by finding an SMTP service that did support Dynamics 365. As mentioned above we first tried working with Amazon Simple Email Service but found that there was no combination of settings that would make this work. The best possible option was port 25 using TLS, but as we were “outside” traffic (as compared to when we were using the Email router and running on a AWS VM) we got throttled rather quickly and I couldn’t even get the 100+ queues through the Test & Enable until things started breaking.
It is important here, to understand that there is a difference between SMTP using TLS (more modern way of securing SMTP) and using SMTP with SSL. The former seems to be what Dynamics 365 is using though I havn’t found any really good definition saying this is so.

It turned out that my customer was using SMTP2GO for another service so we tried it out and it worked fine using port 587 using TLS. SMTP2GO, it seems, has a load of different ports and variations of security setup that can be used. According to my customers operations people, they also like it better than Amazon SES as it gives better feedback on bounces and such which is good (data which would be nice to get into Dynamics of course – good ISV opportunity there!).

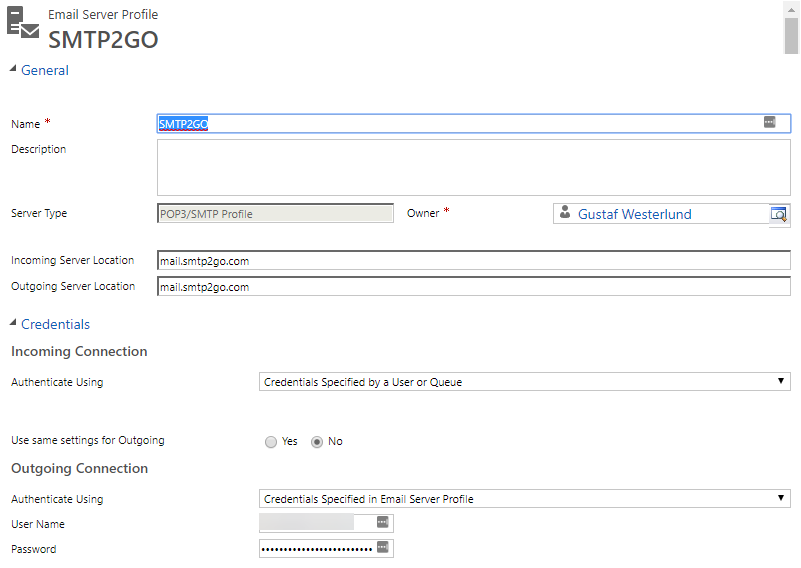
Outgoing settings are not that complicated – each mailbox has the Server Profile “SMTP2GO” which uses the SMTP protocol to send

To understand some of the details of how the SMTP2GO Server profile is setup, look at this picture.

The Server Profile for SMTP2GO – note that the Incoming Server location is not used/is relevant.

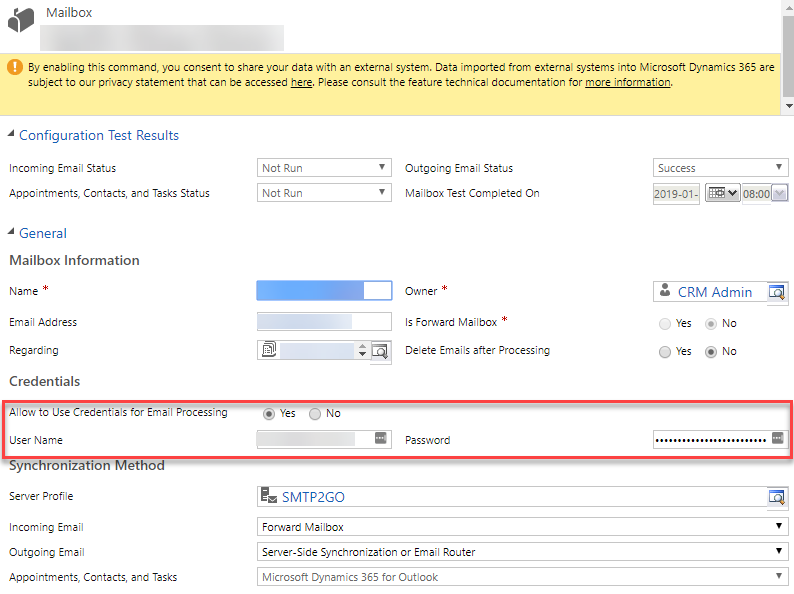
One of the problems I found was that I wasn’t able to set the credentials centrally, on the server profile. It just seems this isn’t supported for SMTP, I do not know why. Hence we had to add the credential (the same) to each and every single queue. I found this was rather easily done in bulk using SSIS with Kingswaysoft or your other favorite tool for this like Scribe or CozyRoc (I havn’t tried them but I guess you could). Or you can of course write a small program. I did try to do it using workflows or bulk edit but that didn’t work. Maybe with some shoehorning you could get that to work. Maybe a Flow could work too. The fields that had to be set can be seen in the picture below:

The queue mailbox record – Note the three fields marked that you need to set as the credentials are set on the queue level. Also note that as the Incoming is “Forward Mailbox” it will not be expected to be tested in the testrun – hence Incoming Email Status :”Not Run”

Testing SMTP Server/Service
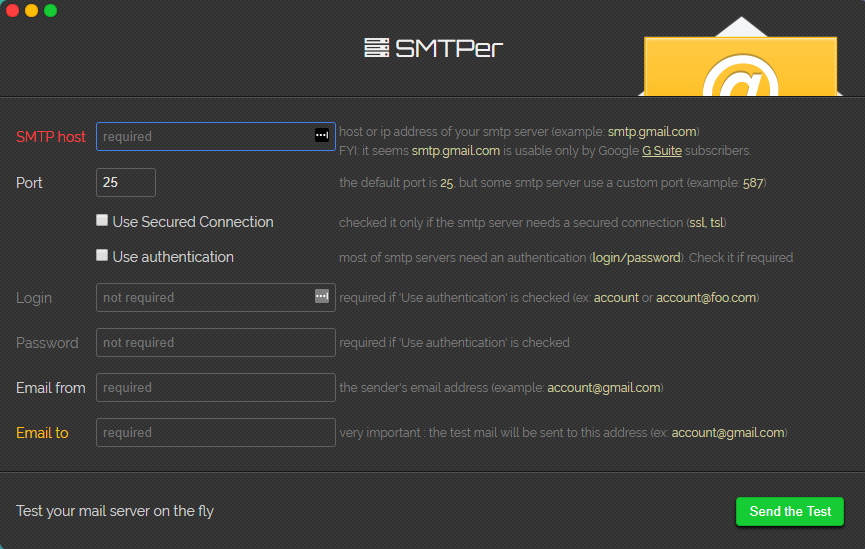
When working with this, and testing out different SMTP providers it is sometimes hard to know where the problem is. Hence it is good to have a good tool to test the SMTP email server to see that it works, that your credential for it work and so on. I got a good tip from one of the operations technicians at my customer, which was the service SMTPer as seen below:

SMTPer – www.smtper.net – great tool for testing a SMTP server

Limitations

What are the limitations of using a technique like this for server side synchronization?

First of all I would say it is that you will not be able to get Appointment, Contacts and Task (ACT) synchronized. Hence it is mostly useful in applications where the Dynamics/CDS is set up to work for Customer Service or in other non-personal uses. If you want ACT synchronization I would recommend trying to get a Dynamics-Exchange synchronization working somehow. Talk to some Exchange experts to see if they have some interesting views on how to solve your issue.

The second drawback of this is complexity. This solution has many moving parts and it can go wrong in many places. There are many different accounts and password that it depends on, thankfully everything will not break if just one password is invalidated, but you will see issues. It is also dependent on different technologies like Dynamics email handling, Exchange rules, SMTP services and so on. This requires rather a broad skillset or several people being involved. Especially if something breaks or just doesn’t work supergood.

Conclusions

Hence, this a setup that I would only recommend if you do not have the option of using Exchange. If you have the option of using Exchange, but cannot get it to work for some reason, try harder or ask for help. Using this kind of solution will limit the end users functionality of Dynamics and is hence more of a “last resort”.

Anonymizing data in UAT/Dev – GDPR

Anonymizing data in UAT/Dev – GDPR

On the eve of GDPR what could be more fitting than a post on GDPR. I think everyone is probably deadly tired of all the consent emails and I think that they will probably even have reached our friends in the US and Asia by now.

This article relates to legal matters on GDPR and are based on my personal interpretations and are not to be viewed as legal advice.

One interesting thing that has to be considered in relation to GDPR is how to handle personal information in non-production environments/instances. Microsoft have made it painfully easy with the instance manager to be able to copy the production instance but do you really have the right to use your customers personal information in a development, UAT or staging environment? Do you have legal support for that? I think that would be a very hard argument to make? Have you gotten your customers explicit consent for using their personal data for that purpose? Probably not. Hence, if you are planning on keeping the instance/environment for more than 30 days, you will need to remove all personal information from to stay within the boundaries of GDPR. I have found that using SSIS with Kingswaysoft and the Anonymization component in the productivity toolkit is very useful. I will in this rather lenghty article describe how I have used it to set up an anoymization script.

First of all you need to download SSDT and Kingswaysoft Dynamics 365 and Productivity Packs

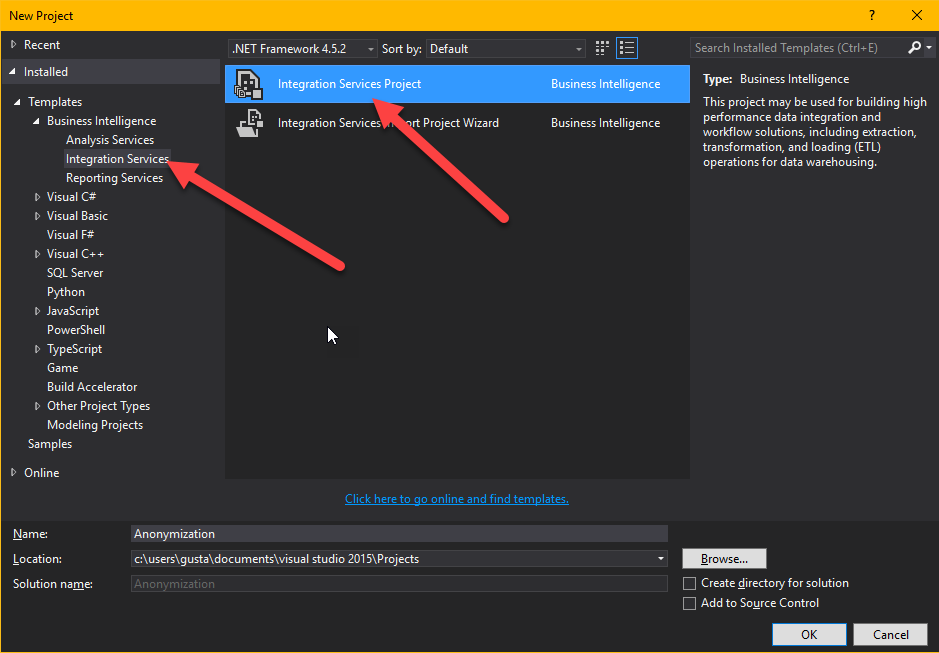
Then start a new Business Intelligence -> Integrations Services project.

Then start by right clicking in the empty field at the bottom where it says “Connection managers” and choose “New connection…”

In the dialog that shows up choose “DynamicsCRM”

You should now see a dialog showing the connection settings to Dynamics.

Connection settings for your instance

Choose the right settings for your instance. Test your connection at the bottom when you are done to make sure it works. Make extra sure you are not connecting to your production environment, wouldn’t want to anonymize that!

When this is done, it is time to make your first Data Flow Task. Work in SSIS is divided into two parts, Control Flow and Data Flow. The control flow is the orchestration, which tells SSIS in which order everything is to be run. If you want thing to run in parallel, just have to boxes next to each other, if you want one Data Flow to run before the other, drag the arrow from the first to the second. It is also possible to have entire “Sequence containers” which can hold several components and make sure they execute before moving to the next stage.

Let’s start by dragging one new Data Flow from the Toolbox on the left hand side to the Control Flow work pane. Then double click it. This will open it up.

You will now see that the tab at the top has changed to “Data Flow” from the previous “Control Flow”. In the “Data Flow” view you will also have a different set of toolbox components available.

In the “Data Flow” you will control a single data flow. For instance the anonymization of Contact.

Start by dragging the Dynamics CRM Source from the toolbox (on the left) to the workspace (the big pane in the middle. Then double click it. – Before looking at the details of the source component, I like using FetchXML when building queries and of course the best way to build queries with FetchXML is using FetchXMLBuilder in XrmToolBox (thanks Jonas Rapp and Tanguy Touzard for all your work!) but if that is too much heavy lifting (it really isn’t), the easiest way to get a FetchXML query is to make an advance find query and export it with the “Download FetchXML” button in the top right hand side of the ribbon of the Advanced Find query builder. So let’s say we have decided the following fields in Contact are personal information and need to be anonymized:

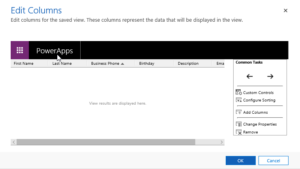
The column editor in advaced find – don’t use composite fields like “fullname” or Address1

Downloading the FetchXml, and setting the Source component in SSDT (Visual Studio) will make it look like this:

I have set the “Connection Manager” to “Target” as we are using the same source and target (reading and writing to the same system.

I am leaving batch size as 2000. Seems to work well. Don’t reduce it too much, remember the API limit of 60 000 calls per 5 min period.

If you would like to try it a bit, you can set the “Max rows returned” to for instance “10” and then try it out a bit to see that it isn’t going crazy.

Source type I like as FetchXML – remember that you can have FetchXMLs with data from several entities which can make queries a lot easier than trying to match the data with lookups in SSIS.

I always try to read all data in UTC and write it in UTC which in most cases makes it correct. But make sure you understand how timezones work if you need to fiddle with this.

Also, don’t include more columns than you need. It will just make your script slow. After adding the FetchXML or changing it, it will try to parse it and read the meta data from Dyn365/CRM. Hence there might be a slight delay. You can check what data you will output from this component by clicking on “Columns” on the left hand side.

When done, press “OK” to go back to the “Data Flow” pane.

Now add a “Data anonymization” component and drag the arrow from the Source component to the Anonymizer. Then double click the anoymizer.

You should see something like this, where I have set anonymization settings for the different columns. By default it will say “Ignore” on all columns.

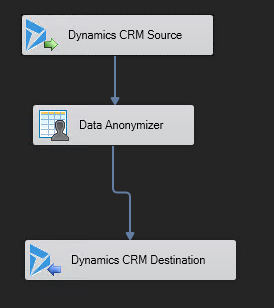
Try out the different anonymization types. Some are more generic than others. When done, click Ok and go back the data flow pane. Add a Dynamics CRM Destination and drag the blue arrow from the anonymizer (blue arrows are the normal data output, red arrows are error output) to the Dynamics CRM Destination component. Then double click it. The view in the data flow should look something like the picture below.

Dyn365 Soruce -> anoymizer -> writing to Dyn365
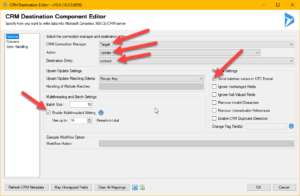
Dyn365 destination component – set values where the arrows are

When setting up the destination component, there are a few things to consider:

  • In this case we are always doing updates – hence set the action to update. It is faster than upsert.
  • You have to set the Destination Entity.
  • If you write data to Dyn365 with high latency, no batching and no threads you will be able to update at about 2-3 records per second. With low latency, correct batch setting and multi threading, I have been able to get up to 300 records per second. Very dependant on entity. Hold the mouse of the blue “i” just after the “Enable Multithread Writing” for some deep end tips from the scholars at Kingswaysoft.
  • Error handling is recommended to be directed at a file or some other output where you can monitor it. If you do nothing about it, and you get an error, it will break the flow and stop. You can control error handling of the destination component by clicking on the “Error handling” tab on the left hand side. Remember that all types of exceptions thrown by Dyn365 you will get here as well, like missing rights, disabled records etc.
A normal problem that needs to be handled is that records are deactivated and deactivated records cannot be changed, they have to be opened first, then changed, then re-closed.
This is an example of a dataflow handling this:
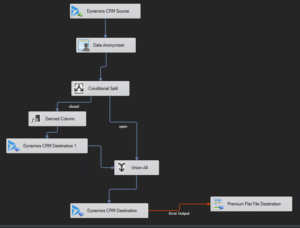
Data flow which splits the deactivated records to the left, adds two special columns to reactivate them, writes an update with only the statecode & statusreason to the record and then merges the two data streams and writes the original values, which recloses the ones that were closed from the beginning

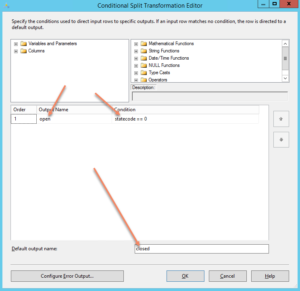
This is how the conditional split is defined – if statecode is 0, send them to the output called “open” otherwise send them to the output called closed

Then you can test run your data flow, by right clicking the data flow pane, and pressing “Execute Task”

And when you have assemble an larger control flow – like for instance this:

A control flow with several dataflow being disabled – all in sequence.

you can execute the entire flow by clicking the green plus sign in the ribbon.

Gustaf Westerlund
MVP, Founder and Principal Consultant at CRM-konsulterna AB
www.crmkonsulterna.se