Team member licensing – hammer coming down!

Team member licensing – hammer coming down!

The team member licensing option is something that has been a subject of debate for quite some time. What can it actually be used for and what not? I have heard “experts” suggesting that it be used for integrations but if your read the Dynamics 365 Licensing Guide, appendix A, you can read all about what Team member licensing is and isn’t. Typical scenarios for Team members are:

  • Read only users
  • Users that use only slim parts of the system, and not the “cool” First-Party-App features in Sales, Customer Service, Field Service etc.
  • Users that just track activities

There are some updates to the details of what a team member can and cannot do, and I think the most important is that a team member cannot CUD (Create, Update or Delete) accounts any more.

How urgent is this? Well, for new instances being created, this will be enforced as of April 1 2020. But for existing instances, it will be enforced on July 1 2020. Hence, you still have some time if you have an exiting org.  

You can opt-in to early access updates. Goes without saying that you shouldn’t do in your production system, and probably not even in you dev/test environments since as soon as you have you won’t be able to depoy changes. So, having an out-of-ALM-environment where you can test this might be a good idea. 

So, the BIG question is, “Are we compliant?” 

Well, there is actually a report that you can generate from the Power Platform Admin Center and I have recorded a video below that shows how you can use that and collate the data with pivoting in Excel.

Top Table Usage in PPAC

Top Table Usage in PPAC

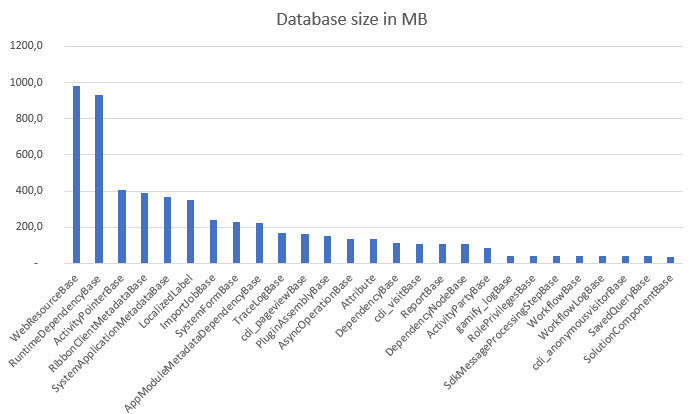
Top Ten Table usage is back from being lost when Organizational Insights was discontinued. A bit tricky to find so check out the video. Awesome tool when trying to reduce the size of large instances, especially important now that the prices per GB are going up to $40/GB (subject to you license agreement).

Fast data management in a limited CDS world

Fast data management in a limited CDS world

In May 2019 Dynamics 365 CE/CDS enacted some new throttling mechanisms that have caused some headaches for anyone wanting to manage a lot of data in CDS (I will refer to Dynamics 365/CDS as just CDS below). There are several different throttles but the one that has cause me most trouble is the concurrency throttle. Kingswaysoft will release support for handling this in the next release and you can also request a special version from them if you ask nicely. In the meanwhile this post can give you some help on how to work as fast as possible using application user mulitplexing and a loop with a 5 min wait to make sure that the throttles are reset.

The new throttling on the main CDS API, as described here: https://docs.microsoft.com/en-us/dynamics365/customer-engagement/developer/api-limits needs to be carefully considered when doing heavy data manipulations in the CDS. One of my customers has a large system with numerous integrations of which the most data heavy are the Marketing Automation systems and the booking systems. And yes, this is Business to consumer.

With the new per GB pricing, keeping the database as small as possible has become an essential task and using the bulk delete just doesn’t work for large data loads, at the time of writing this article. I do hope that Microsoft increase the speed of it so that it does become more useful but currently its speed is somewhere around 1-2 records per second.

The bulk delete also has limitations on that it can only base it selections on a query, i.e. a FetchXML. Often this is not enough, for instance when you want to remove “All emails except those that have any connection to either a case or a contact which has a case”.

For these reasons I almost always opt for using SSIS with Kingswaysoft connectors to CDS when working with complex data management. This article will be on how to get some performance now that there is tougher throttling to take into consideration.

User multiplexing

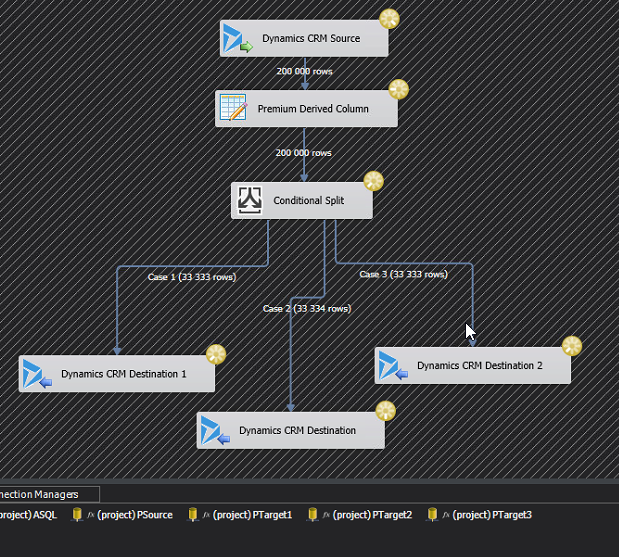
As the throttling is measured on a “per user”, one trick is of course to use multiple users and spread the load over all these users. You can, of course use normal users, but that will cost you licenses so the smart person will of course use application users instead. If you don’t know how to create application users in Dynamics 365, check it out here: https://docs.microsoft.com/en-us/dynamics365/customer-engagement/admin/create-users-assign-online-security-roles#create-an-application-user . In the example below, I will be using four different application users, one as the source account and three as destinations. The reason for this is that it is typically easier to read several thousand rows per request, but seldom efficient to do batch creates/writes/deletes of more than 10-20.

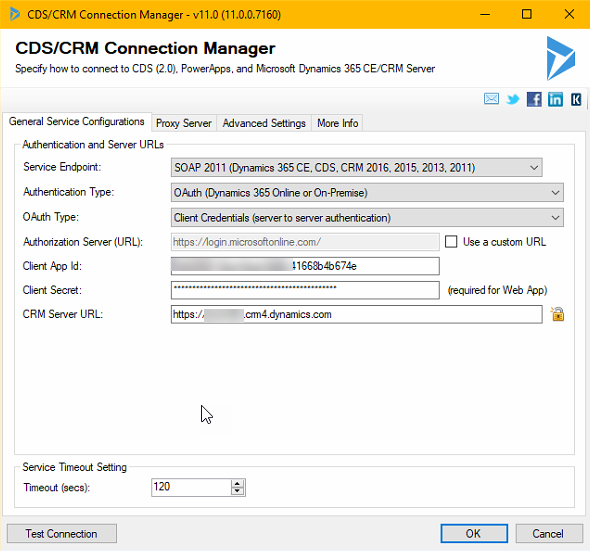
To do this with SSIS/Kingswaysoft you should start by setting up the connections. In this case, the four CDS/CRM connections and use the OAuth auth-type like below. 

As you might want to have several packages in the same project and have them share the connections, it may be a good idea to use project connections. I also use an Azure SQL db for logging any errors. Previously I used to use CDS but now with the throttling, that is not such a good idea as the error itself might be throttling and hence the error can cause an error. Writing to some target that you know will not fail is hence a good idea for logging errors. When you are done with the connections, it should look something like this:

Now it is time to build the actual flow. If you’d normally have a Source and a Target, it will now look something like the image below, which I will explain.

First of all, the Premium Derived Column creates a new column which simply contains the row number. It will look something like this: 

I like to use the components that are available in the Productivity pack from Kingswaysoft, and this Premium Derived Column is one of these. In this case I think it is actually equal if you use IncrementalValue() or RowIndex(). I think you can create this logic with a normal Derived Column too, it just has less features.

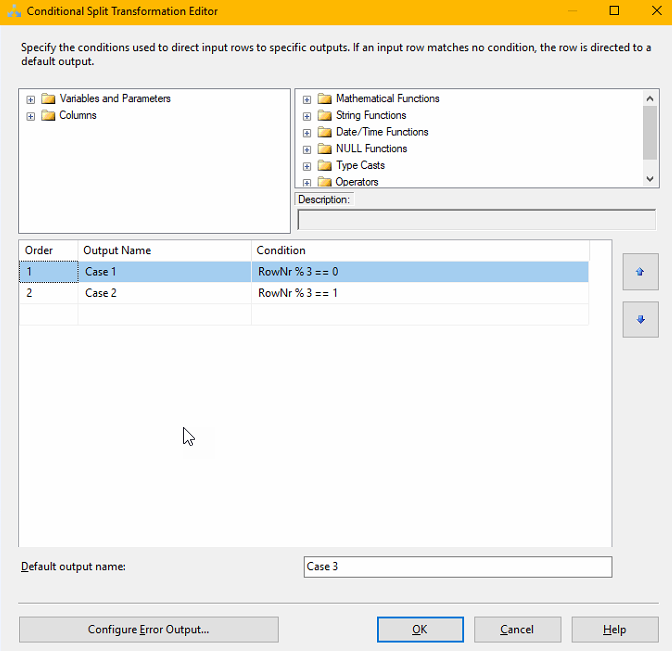
Next we need to create a Conditional split that divides the rows evenly between the three destination components. This is done using the mathematical operator modulus which is written using the “%”-sign. For those that didn’t study this in school, it simple means “the rest” in a division. For instance 5%3=2, if you divide 5 by 3 you will get 1 and a rest of 2. What we will do, is assign RowNr%3 == 0 to Case 1, RowNr%3 == 1 to Case 2 and the rest to Case 3. That should divide them evenly. It looks like this: 

You then create the three destination components. I typically create one first, copy it and change it, as that is faster. Make sure that you set the Connection Manager to the three different Target Connections.

I also recommend that you fiddle a bit with the batch size and the number of threads and test out which gives the best results for you and the entity and action you are working on. There is no one answer here. I would typically start at Batch 10, Threads 16.

Tuning DataFlow property settings

If you back out to the Control Flow view and right click on the Data Flow you have created, there are some other interesting setting you can twirk.

DefaultBufferMaxRows – 10 000

DefaultBufferSize – 10 485 760 (10MB)

EngineThreads – 10

These can also be tuned to allow for the Data Flow to handle more rows, more memory and use more parallell threads which of course will make it faster (if that is the bottle neck, typically not when working with Dynamics)

What I have found is changing the maxrows to 100k, the buffer size to 100 MB and engine threads to 32 will not hurt but you can find several other blog articles specializing in SSIS that discuss this.

Crude throttle handler

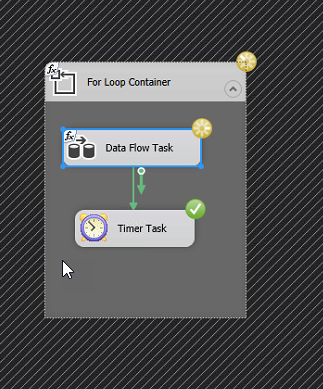
What I have noticed is that many of my Dataflows simple seem to grind to a halt after 400-600k rows read from Dynamics. Not sure if it the read or write part that is causing this but what I figured is that probably the most pragmatic way of solving this would be to create a loop that runs a data flow that is limited in the number of records, typically 400k, wait 5 minutes then iterate. Smartest version is of course to have a control variable which checks to see when when there are no more rows and then breaks the loop, simpler version is to just loop n number of times to cover the amount of data you are trying to move, ie. number of rows per iteration x number of iterations. It would look something like the picture to the left.

If you would like to refine the loop a bit to make it more automatic, create a variable of type Int, for instance RowCount, set the initial value to be 10 or something different from 0. Then set the EvalExpression to “@RowCount > 0”. After this add a RowCounter control to the Data Flow and connect this to the variable RowCount. When the Data Flow runs and returns 0 rows, it will run to the end, the EvalExpression will evaluate to “False” which will cause it to break.

Using this technique, I am able to remove several million records in just a few hours. With one of these jobs I managed to remove 20 GB of structured data in less than two days (no attachments or similar, just records). By adding more application accounts and of course both to the source and particulary to the destination side, you can increase the speeds you are getting.

I do also advise you to be on the lookout for Kingswaysofts new version which I think will come soon, and do as I, make sure to always download both the Dynamics and Productivity Pack. I have read that there are great things coming to the productivity pack!

How to reduce SubscriptionTrackingDeletedObject table in CDS/Dynamics 365 – Updated!

How to reduce SubscriptionTrackingDeletedObject table in CDS/Dynamics 365 – Updated!

One of my customers is a B2C customer with a very large online database exceeding 500 GB. With a very active Marketing automation tool interated, we generate a lot of data in Dynamics 365 CE which after defined retention periods needs to be removed. This has caused some side effects, that a table called SubscriptionTrackingDeletedObject has become very large. This article will describe how to set a configuration to reduce its size. UPDATED – Based on some new learning and information from Microsoft this article has now been updated!

We often monitor the Organizational Insights, and now lately the brand new capacity feature that can be found in the left hand menu in https://admin.powerplatform.microsoft.com, if you have a CDS/Dynamics 365 CE instance.

An interesting table started growing rapidly and we had no clue what this was, and I had during my now 15 years of working with Dynamics 365 never seen it. It was called SubscriptionTrackingDeletedObject. When I came back from my Swedish summer vaccation, it had grow to over an amazing 181M records. Time to fix this.

First thing, as usual is of course to google it (yes, it is a verb, get used to it). All I found was this somewhat informative post by my good friend Chris Cognetta who is an ace with infrastructure issues.

http://cognettacloud.net/2016/06/21/crm-database-log-growth-issue/ 

However, it seemed that they just truncated the table, and we were online so that was a bit tricky, to say the least. I was at this time a bit upset that Microsoft were taking up around 50GB of space for my customer without giving me any way of managing that, or having any direct use of it. I counted to ten and called Microsoft Support.

After a few emails back and forth, the excellent support technician at Microsoft informed me that there is actually a setting in the infamous super secret setting tool with the Star Trek-sounding name OrgDBOrg (it is pronounced “Org-D-Borg” in case you ever get stuck in Dynamics trivia). The setting is called ExpireSubscriptionsInDays. I will quote the support technician in what this table is used for and if anyone has any more information, please leave a comment.

“The SubscriptionTrackingDeletedObject table is the table that logs records for number of days before deleting inactive subscriptions as well as timed out deletion services.”

I am not sure for which purpose. If it is in regards to GDPR or some restore mechanism. I would like to know though. Default value for this i 90, which means that these logs will be stored for 90 days. The minimum they can be set to is 1. As I am currently not entirely sure what these logs are used for, I would not recommend you set them to 1, but I did set my customers to 5, hoping that this is not going to come back with a vengance.

We have during the day seen a dramatic drop in the amount of records in this table, with about 30M but and it is still ongoing, but hard to measure as there is a delay in the capacity measurement the Powerplatform admin portal.

Update! The size of the table fell to 160M rows but never below this so after some further discussions with Microsoft support they did some more investigation into this subject and came back with the following recommendation:

1. Reduce the value gradually from 90 to 60 and then on
2. Never go below 15

There is however, another related setting called ExpireChangeTrackingInDays which is located just next to the ExpireSubscriptionsInDays. This is defaulted to 30. We reduced this to 15. 

Based on these recommendations we tried 60 days and this resulted in a most dramatic drop to around 20M rows. – End of update


So, how do you do this? First, download the OrgDbOrgSettings tool and install it in the instance where you are having issues. Check out these links below for that:

https://github.com/seanmcne/OrgDbOrgSettings/blob/master/readme.md

https://github.com/seanmcne/OrgDbOrgSettings/releases

A word of advice regarding OrgDbOrg; don’t think that you are Captain Kirk and go flying off into the Beta Quadrant and beam every single setting just because you can. It won’t make your system better, rather the opposite. Make really sure on what you are doing and don’t even trust a blog article like this, read the KB-article linked in the tool and make up your own mind. It is a powerful tool, like a jackhammer.

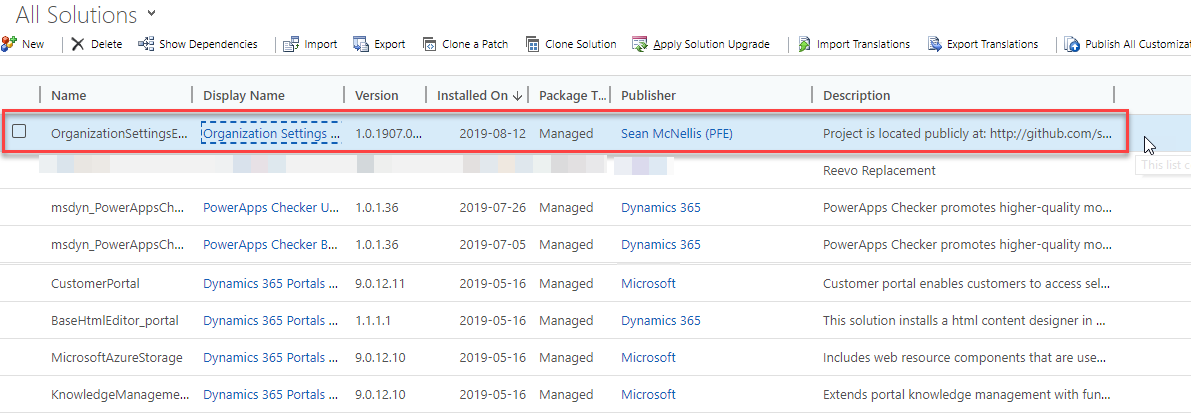
After you have installed the OrgDbOrgSettings tool, you can see it and open it by clicking the display name.

Then just find the “ExpireSubscriptionsInDays” – Press “Edit” and change to whatever you would like it to be. You will typically have to confirm to save it to Dynamics 365 CE/CDS

With that done you should just have to wait for the magic to be done.

As far as I have understood these two settings and this table is used to indicate how long changes and deletes are stored in this table and related tables for integrating systems to be able to read. This can, for example be Data Export Service, the old Dynamics for Outlook client etc. Hence reducing the numbers to, for instance 15 (the lowest recommended number by Microsoft) can result in some changes not being propageted to these integrated systems in the case that the integrations or just an offline client being offline for more than 15 days. And I also got the feeling that setting it to 5 was below some internal threashold and hence wasn’t really supported despite the fact that it says in OrgDBOrg that the lowest value is 1.

Azure guest accounts in CDS/Dyn365

Azure guest accounts in CDS/Dyn365

Azure Active Directory (AAD) has a feature where it allows users of foreign tennants to be granted access to the current tennant. In other word, if you are running contoso.com and a user of northwind.com would like to have access, you can add this user as a guest account in Azure. However, I have found that giving this user access to Dynamics is not fully straight forward, although, it is far from rocket science. In this article I will show how this is done.

Do note that I have heard from people in the product team that there are features of the powerplatfor that cannot currently be accessed using a guest account, I think it was Canvas Apps and Flow. I will have to try this out and get back to you (or someone else could! – I would appreciate a link back to this article) in a later article. I also do think that they are workin on this.

On a high level, what we need to do is:

  1. Add user in AAD
  2. Grant License
  3. Wait for the user to pop up in CDS/Dynamics
  4. Assign a security role in CDS/Dynamics

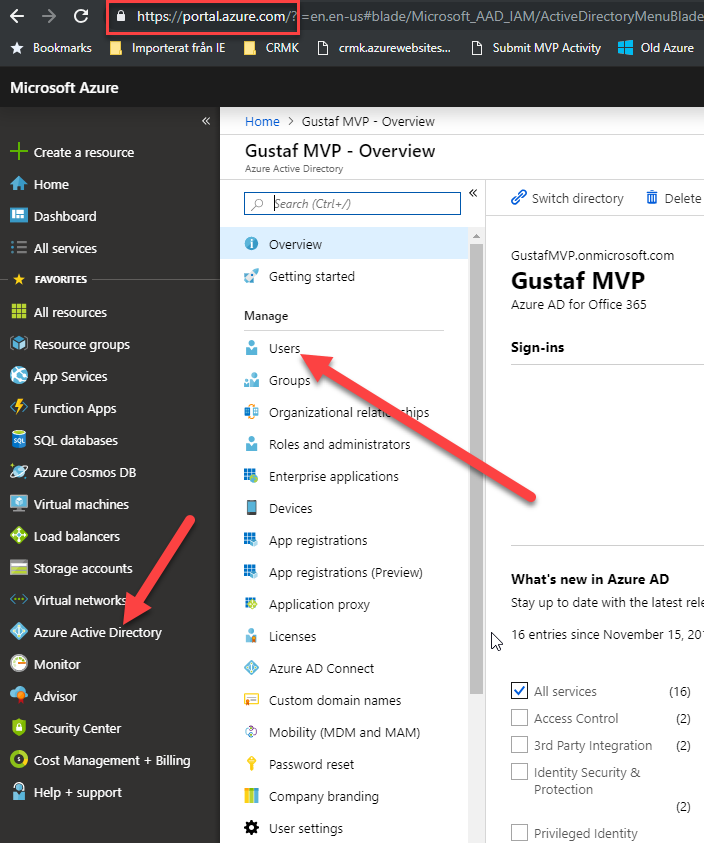
To start with, we need to go to the Azure Portal: https://portal.azure.com – and click on the AAD menu item on the left.


Browse to portal.azure.com -> click Azure Active Directory (AAD) -> Click Users

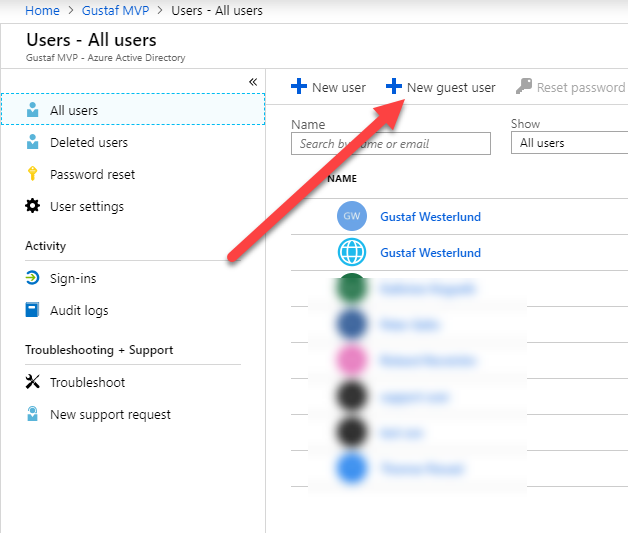
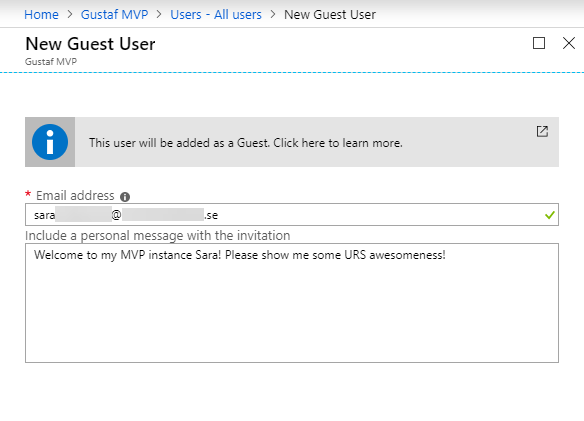
Click “New guest user”

Enter the email address of the user, and perhaps some nice personal email message showing you are not some evil spammer!

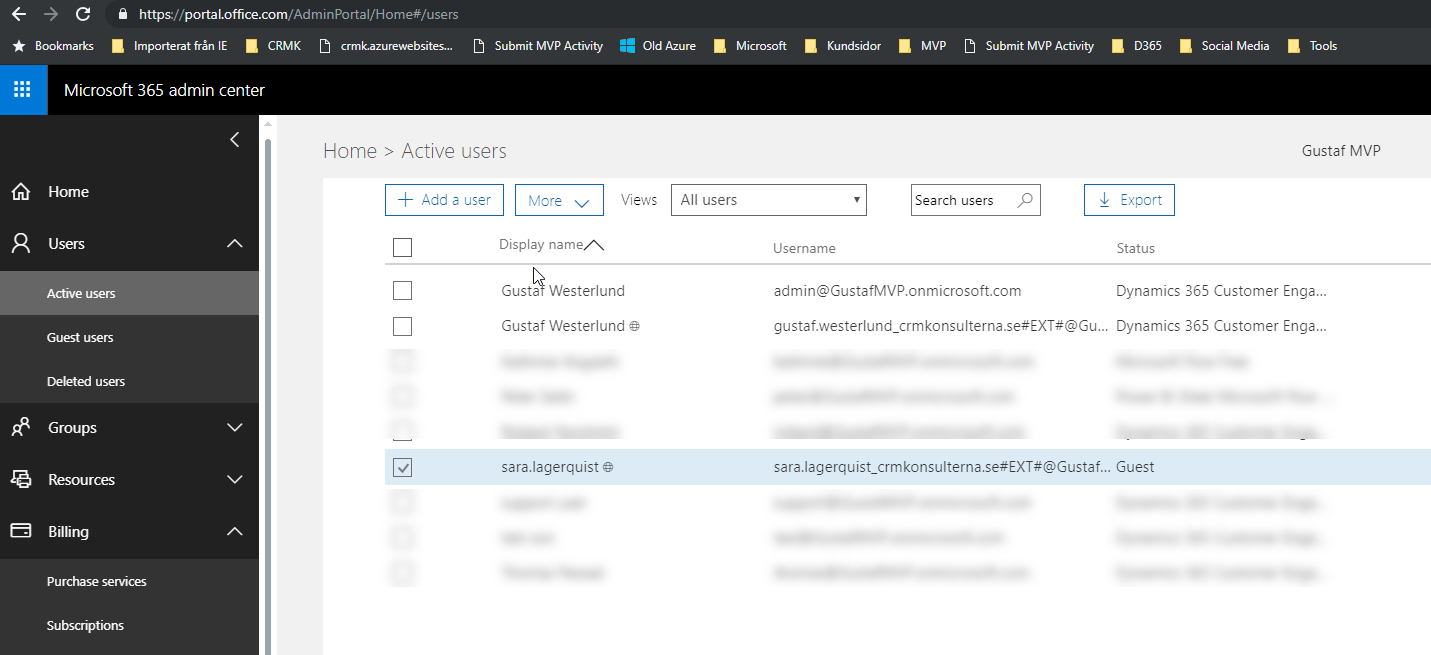
Then go to portal.office.com and you will now be able to see the new guest user in here.

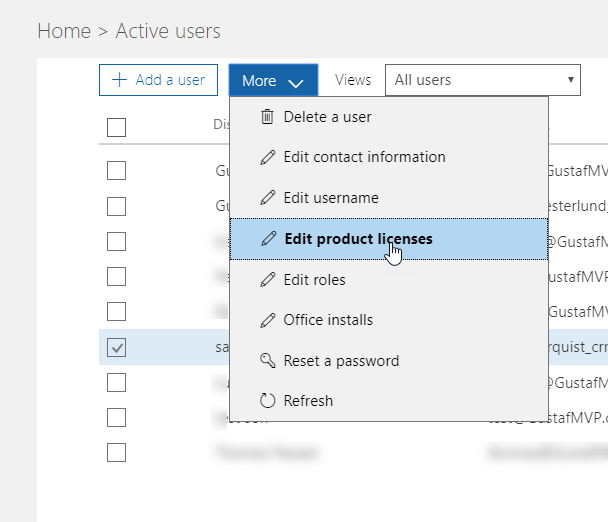
Select the guest user and click “Edit product licenses” – Note, I have not been able to set licenses directly by opening the user, only this way.

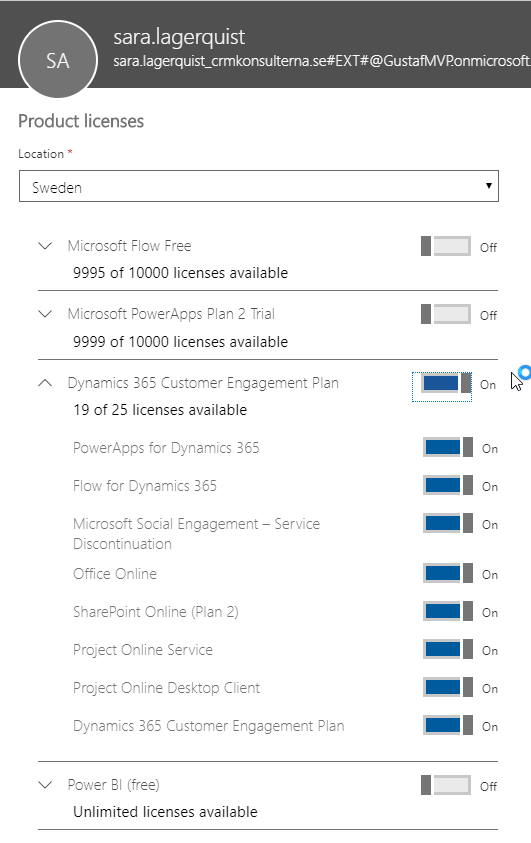
Assign the license required, P2 or Dynamics Customer Engagement App or Plan – in the example above, a Dyn365CE Plan 1 (trial)

After you have assigned the guest user a license, you have to wait a while until the asynchronous service in O365 provisions the user in the CDS. This often is rather quick, but sometimes takes more time. When I was making this, it took more than 15 minutes.

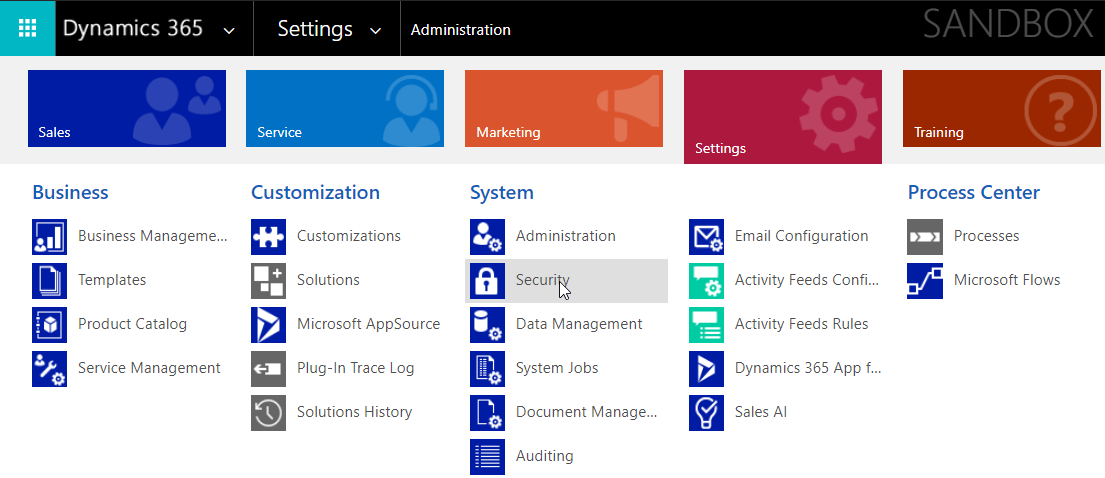
To find the user in CDS/Dyn365 go to Settings and click on Security. (Old UI)

And then click on “Users” in the Security area.

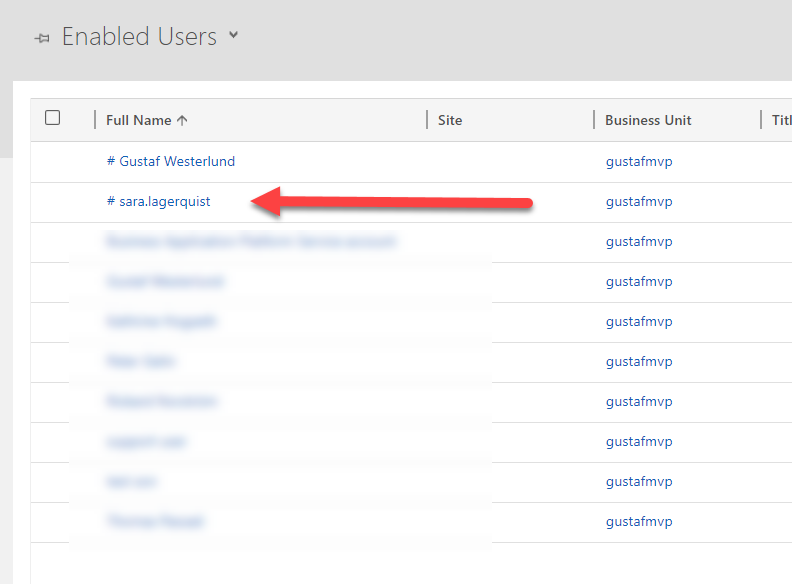
This is how a guest user look like in Dynamics 365/CDS. It has a # sign in front of it. As you can see, I have another one with my name previously created.

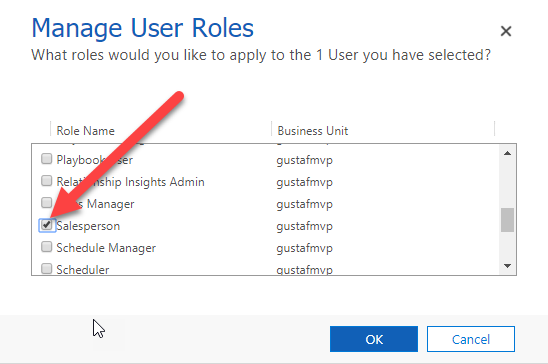
The last thing that has to be done is to grant the guest user the correct role.

After this, just give the user the direct URL to the system and they should be able to log in with their normal users.

This is a very useful method to use when setting up trials for someone as they do not have to sign in with another account to access they system. I strongly recommend it.

As mentioned in the beginning of this article, there might still be some issues with using canvas apps and Flow using guest users, so do be aware that not all features could be available.