by gustaf | Feb 14, 2019
Time for a new blog engine, time for a new blog title and time for my own domain to blog from and above all, time for Jonas Rapp to stop nagging about me blogging on blogspot. Old blog is still up and running and I will keep it there for some time as long as people find interesting stuff there.
As you might be aware of, I have been blogging on blogspot since May 24 2006. That is quite some time, almost 13 years now. Some periods have been more energetic than others, and I guess that is only natural. During this time my life has changed a lot. Since then I have gone from a CRM developer being employed as the only CRM-expert and SharePoint expert at Humandata at that time a smaller company of less than 10 people. I have since worked a couple of years at Logica, now CGI, and 2010 I started my own company, CRM-Konsulterna which now has grown to 15 employees. I have also during this time gotten two kids, Nora and Adrian, who are now 11 and 8. The article on my blog about Nora’s birth being the only one not strictly about Dynamics (and SharePoint as it was originally focused on as well).
Otherwise, it has received several awards for its content and I generally have tried to focus a lot on the who the readers are and attemted to not write anything that would dilute your trust. I have been given many offers during the years of companies wanting to market their products on my blog and I also during a short time tried some ads but I found that it was really counter acting the point of the blog. I would rather share what I know so that people can build trust in that I know what I do so that they do not hesitate to contract me. Diluting this is just dumb.
But now new times! This new blog is running on WordPress with the world famous Divi Theme. I hope you like it and if you have any comments about the layout or anything else, please leave a comment and I will see to that. I have some articles in store waiting to come out (the store is above my shoulders), one regarding complex email setups with Server Side Sync which I think many might find interesting as it is not a very common scenario so when you run into it, a good references might be needed.
I have imported the old blog entries into this blog. They might be sorted a bit weirdly and so, I won’t put too much energy into fixing that, more into writing new stuff.
Hope to hear from you in the future and that I have will have the strenght to continue this blog for the next 13 years.
Gustaf

by gustaf | Dec 2, 2018
Working with a Flow to do some text analysis and sentiment analysis on Voice of the customer responses.
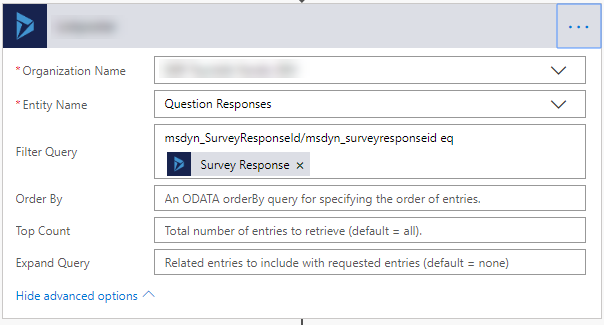
The trick, as the payment model is per run, is to trigger it per Survey Response, and not Question Response. Hence the logic has to loop through all the question responses.
The way you create a filter in Flow for the query is to use Odata filters. However, I found that these were a casing nightmare, which those of you who have worked with more, probably also have noticed.
After troubleshooting a lot with different queries in the browser I finally found that the following actually worked. Note that you will have t change the guid to your own.
https://contoso.api.crm4.dynamics.com/api/data/v9.1/msdyn_questionresponses?$select=msdyn_name,msdyn_SurveyResponseId&$filter=msdyn_SurveyResponseId/msdyn_surveyresponseid%20eq%20460279E7-2AF2-E811-A97F-000D3AB0C08C
The tricky part, as you can see, is that the first part of the lookup attribute, is defined in camel-case and the one in the related entity (Survey Response) in lower case.
The part you need in the Flow is the last part, but it is useful to test it directly in the browser to make sure you get the syntax correct.
 |
| Its the filter part of the query that you are to enter into the “Filter query” field, and make sure to make it dynamic. 🙂 |
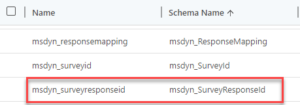
And this is how it looks in Dynamics 365 CE if you check out the fields. I like to look at them in the list view as I can see the schema name there, which isn’t visible in the Form.
 |
| msdyn_SurveyResponseId Lookup from the Question Response Entity. As you can see it seems to be using the Schema name above. |
 |
| This is the primary field Survey Response. Do note the subtle difference between the fields, that Id is spellt with a capital “I” in the Schema name. Based on the information above, it hence seems to be using “Name” to indicate the field. |
Hence based on the above, the supposition would be that the syntax is <Schemaname of the lookup>/<name of field in target entity>
I then did a query to business Unit and I was very surprised to find that it was rather inconsistent and looked like this:
https://contoso.api.crm4.dynamics.com/api/data/v9.1/businessunits?$select=cntso_organizationbaseurl&$filter=parentbusinessunitid/businessunitid%20eq%20null
with just the query that would be
parentbusinessunitid/businessunitid eq null
Let’s have a look at the fields in Dynamics:
 |
| The Parent Business Unit Lookup in Business Unit (Self Referential). Note that the Schema name is Pascal Case. |
 |
| key field, businessunitid in Business Unit |
And as you can see, if we were to follow the syntax set by the example above, this should be:
ParentBusinessUnitId/businessunitid
However, that didn’t seem to work, and as a pragmatist, I have to conclude, somewhat sad, that this doesn’t seem to be very consistent.
My recommendation is hence when working with this:
- Do not take any casing for granted
- <Schemaname of the lookup>/<name of field in target entity> is probably correct for most custom fields/entities.
- Many older entities and fields, like the businessunit shown above, has been there since CRM 1.0 or at least 3.0, if I remember correctly and hence the syntax might be different.
- Test your queries directly in the browser like I have shown above.
Good luck with your Flows.
And if you know Swedish, make sure you check out my colleague Martin Burmans article on Flow as well. Not sure how well it turns out in translation. https://www.crmkonsulterna.se/flow-i-medvind/
Gustaf Westerlund
MVP, Founder and Principal Consultant at CRM-konsulterna AB
www.crmkonsulterna.se
by gustaf | Nov 21, 2018
Tonight Microsoft rolled out an update to Dynamics 365 that seemed to have had a few issues. Most noteably if you have any Lookup-fields in a quickfind views “Find”-columns, it will break. Most of the time, not always. Microsoft knows about this, there are angry threads talking about this, like this one: https://community.dynamics.com/crm/f/117/t/301925?pi61802=3#responses
and you can of course create your own support ticket with Microsoft at https://admin.powerplatform.microsoft.com/
The temporary solution to get this working, or the essential parts for your system, is to remove the Lookup fields from your find columns for the entities that are breaking. This will of course have the effect that no searching can be done in this entity, but you can switch it on again later.
We have also done some preliminary tests and it seems like the UCI (Unified Interface) is not affected by this. So making a quick UCI App could also be a good, fast fix, especially for the most critical user groups.
Note also, that some lookups may break as they use the quickfind logic to search the related entity when you are inputing data. Hence if this happens, you might have to do an interim fix there too.
The error is a “SQL Error” and if you download the logfile, there are two different error messages that I have seen/heard of: (I changed the fieldname to “contactidName“)
Unhandled Exception: System.ServiceModel.FaultException`1[[Microsoft.Xrm.Sdk.OrganizationServiceFault, Microsoft.Xrm.Sdk, Version=9.0.0.0, Culture=neutral, PublicKeyToken=31bf3856ad364e35]]: System.Xml.XmlException: Microsoft.Crm.CrmException: Sql error: ‘Invalid column name ‘contactidName’.’
at Microsoft.Crm.Application.Platform.ServiceCommands.PlatformCommand.XrmExecuteInternal()
at Microsoft.Crm.Application.Platform.ServiceCommands.RetrieveMultipleCommand.Execute()
at Microsoft.Crm.ApplicationQuery.RetrieveMultipleCommand.RetrieveData()
at Microsoft.Crm.ApplicationQuery.ExecuteQuery()
at Microsoft.Crm.Application.Platform.Grid.GridDataProviderQueryBuilder.GetData(QueryBuilder queryBuilder)
at Microsoft.Crm.Application.Platform.Grid.GridDataProviderQueryBuilder.LoadQueryData()
at Microsoft.Crm.Application.Platform.Grid.GridDataProviderQueryBuilder.LoadData()
at Microsoft.Crm.Application.Platform.Grid.GridDataProviderBase.PrepareGridData()
at Microsoft.Crm.Application.Platform.Grid.GridDataProviderBase.PrepareData()
at Microsoft.Crm.Application.Controls.GridUIProvider.Render(HtmlTextWriter output)
at Microsoft.Crm.Application.Components.UI.Grid.DataGrid.RenderInnerHtml(HtmlTextWriter output)
at Microsoft.Crm.Core.Application.WebServices.AppGridWebServiceHandler.GetResetResponseHtml(AppGrid appGrid, StringBuilder sbHtml)
at Microsoft.Crm.Core.Application.WebServices.AppGridWebServiceHandler.Reset(String gridXml, String id, StringBuilder sbXml, StringBuilder sbHtml)
at Microsoft.Crm.Core.Application.WebServices.AppGridWebServiceHandler.ProcessRequestInternal(HttpContext context) —> Microsoft.Crm.CrmException: Sql error: ‘Invalid column name ‘kuoni_BookingIdName’.’
at Microsoft.Crm.Application.Platform.ServiceCommands.PlatformCommand.XrmExecuteInternal()
at Microsoft.Crm.Application.Platform.ServiceCommands.RetrieveMultipleCommand.Execute()
at Microsoft.Crm.ApplicationQuery.RetrieveMultipleCommand.RetrieveData()
at Microsoft.Crm.ApplicationQuery.ExecuteQuery()
at Microsoft.Crm.Application.Platform.Grid.GridDataProviderQueryBuilder.GetData(QueryBuilder queryBuilder)
at Microsoft.Crm.Application.Platform.Grid.GridDataProviderQueryBuilder.LoadQueryData()
at Microsoft.Crm.Application.Platform.Grid.GridDataProviderQueryBuilder.LoadData()
at Microsoft.Crm.Application.Platform.Grid.GridDataProviderBase.PrepareGridData()
at Microsoft.Crm.Application.Platform.Grid.GridDataProviderBase.PrepareData()
at Microsoft.Crm.Application.Controls.GridUIProvider.Render(HtmlTextWriter output)
at Microsoft.Crm.Application.Components.UI.Grid.DataGrid.RenderInnerHtml(HtmlTextWriter output)
at Microsoft.Crm.Core.Application.WebServices.AppGridWebServiceHandler.GetResetResponseHtml(AppGrid appGrid, StringBuilder sbHtml)
at Microsoft.Crm.Core.Application.WebServices.AppGridWebServiceHandler.Reset(String gridXml, String id, StringBuilder sbXml, StringBuilder sbHtml)
at Microsoft.Crm.Core.Application.WebServices.AppGridWebServiceHandler.ProcessRequestInternal(HttpContext context)
— End of inner exception stack trace —
at Microsoft.Crm.Core.Application.WebServices.AppGridWebServiceHandler.ProcessRequestInternal(HttpContext context)
at System.Web.HttpApplication.CallHandlerExecutionStep.System.Web.HttpApplication.IExecutionStep.Execute()
at System.Web.HttpApplication.ExecuteStepImpl(IExecutionStep step)
at System.Web.HttpApplication.ExecuteStep(IExecutionStep step, Boolean& completedSynchronously): Microsoft Dynamics CRM has experienced an error. Reference number for administrators or support: #BDDD78E5Detail:
<OrganizationServiceFault xmlns:i=”http://www.w3.org/2001/XMLSchema-instance” xmlns=”http://schemas.microsoft.com/xrm/2011/Contracts”>
<ActivityId>64efc536-e25e-4e36-a163-dbe707b07302</ActivityId>
<ErrorCode>-2147220970</ErrorCode>
<ErrorDetails xmlns:d2p1=”http://schemas.datacontract.org/2004/07/System.Collections.Generic” />
<Message>System.Xml.XmlException: Microsoft.Crm.CrmException: Sql error: ‘Invalid column name ‘contactidName‘.’
at Microsoft.Crm.Application.Platform.ServiceCommands.PlatformCommand.XrmExecuteInternal()
at Microsoft.Crm.Application.Platform.ServiceCommands.RetrieveMultipleCommand.Execute()
at Microsoft.Crm.ApplicationQuery.RetrieveMultipleCommand.RetrieveData()
at Microsoft.Crm.ApplicationQuery.ExecuteQuery()
at Microsoft.Crm.Application.Platform.Grid.GridDataProviderQueryBuilder.GetData(QueryBuilder queryBuilder)
at Microsoft.Crm.Application.Platform.Grid.GridDataProviderQueryBuilder.LoadQueryData()
at Microsoft.Crm.Application.Platform.Grid.GridDataProviderQueryBuilder.LoadData()
at Microsoft.Crm.Application.Platform.Grid.GridDataProviderBase.PrepareGridData()
at Microsoft.Crm.Application.Platform.Grid.GridDataProviderBase.PrepareData()
at Microsoft.Crm.Application.Controls.GridUIProvider.Render(HtmlTextWriter output)
at Microsoft.Crm.Application.Components.UI.Grid.DataGrid.RenderInnerHtml(HtmlTextWriter output)
at Microsoft.Crm.Core.Application.WebServices.AppGridWebServiceHandler.GetResetResponseHtml(AppGrid appGrid, StringBuilder sbHtml)
at Microsoft.Crm.Core.Application.WebServices.AppGridWebServiceHandler.Reset(String gridXml, String id, StringBuilder sbXml, StringBuilder sbHtml)
at Microsoft.Crm.Core.Application.WebServices.AppGridWebServiceHandler.ProcessRequestInternal(HttpContext context) —> Microsoft.Crm.CrmException: Sql error: ‘Invalid column name ‘contactidName‘.’
at Microsoft.Crm.Application.Platform.ServiceCommands.PlatformCommand.XrmExecuteInternal()
at Microsoft.Crm.Application.Platform.ServiceCommands.RetrieveMultipleCommand.Execute()
at Microsoft.Crm.ApplicationQuery.RetrieveMultipleCommand.RetrieveData()
at Microsoft.Crm.ApplicationQuery.ExecuteQuery()
at Microsoft.Crm.Application.Platform.Grid.GridDataProviderQueryBuilder.GetData(QueryBuilder queryBuilder)
at Microsoft.Crm.Application.Platform.Grid.GridDataProviderQueryBuilder.LoadQueryData()
at Microsoft.Crm.Application.Platform.Grid.GridDataProviderQueryBuilder.LoadData()
at Microsoft.Crm.Application.Platform.Grid.GridDataProviderBase.PrepareGridData()
at Microsoft.Crm.Application.Platform.Grid.GridDataProviderBase.PrepareData()
at Microsoft.Crm.Application.Controls.GridUIProvider.Render(HtmlTextWriter output)
at Microsoft.Crm.Application.Components.UI.Grid.DataGrid.RenderInnerHtml(HtmlTextWriter output)
at Microsoft.Crm.Core.Application.WebServices.AppGridWebServiceHandler.GetResetResponseHtml(AppGrid appGrid, StringBuilder sbHtml)
at Microsoft.Crm.Core.Application.WebServices.AppGridWebServiceHandler.Reset(String gridXml, String id, StringBuilder sbXml, StringBuilder sbHtml)
at Microsoft.Crm.Core.Application.WebServices.AppGridWebServiceHandler.ProcessRequestInternal(HttpContext context)
— End of inner exception stack trace —
at Microsoft.Crm.Core.Application.WebServices.AppGridWebServiceHandler.ProcessRequestInternal(HttpContext context)
at System.Web.HttpApplication.CallHandlerExecutionStep.System.Web.HttpApplication.IExecutionStep.Execute()
at System.Web.HttpApplication.ExecuteStepImpl(IExecutionStep step)
at System.Web.HttpApplication.ExecuteStep(IExecutionStep step, Boolean& completedSynchronously): Microsoft Dynamics CRM has experienced an error. Reference number for administrators or support: #BDDD78E5</Message>
<Timestamp>2018-11-21T09:41:26.798591Z</Timestamp>
<ExceptionRetriable>false</ExceptionRetriable>
<ExceptionSource i:nil=”true” />
<InnerFault>
<ActivityId>64efc536-e25e-4e36-a163-dbe707b07302</ActivityId>
<ErrorCode>-2147204784</ErrorCode>
<ErrorDetails xmlns:d3p1=”http://schemas.datacontract.org/2004/07/System.Collections.Generic” />
<Message>Sql error: ‘Invalid column name ‘contactidName‘.'</Message>
<Timestamp>2018-11-21T09:41:26.798591Z</Timestamp>
<ExceptionRetriable>false</ExceptionRetriable>
<ExceptionSource i:nil=”true” />
<InnerFault i:nil=”true” />
<OriginalException i:nil=”true” />
<TraceText i:nil=”true” />
</InnerFault>
<OriginalException i:nil=”true” />
<TraceText i:nil=”true” />
</OrganizationServiceFault>
Second error:
Unhandled Exception: System.ServiceModel.FaultException`1[[Microsoft.Xrm.Sdk.OrganizationServiceFault, Microsoft.Xrm.Sdk, Version=9.0.0.0, Culture=neutral, PublicKeyToken=31bf3856ad364e35]]: System.Xml.XmlException: Microsoft.Crm.CrmException: A quick find filter cannot have any child filters
at Microsoft.Crm.Application.Platform.ServiceCommands.PlatformCommand.XrmExecuteInternal()
at Microsoft.Crm.Application.Platform.ServiceCommands.RetrieveMultipleCommand.Execute()
at Microsoft.Crm.ApplicationQuery.RetrieveMultipleCommand.RetrieveData()
at Microsoft.Crm.ApplicationQuery.ExecuteQuery()
at Microsoft.Crm.Application.Platform.Grid.GridDataProviderQueryBuilder.GetData(QueryBuilder queryBuilder)
at Microsoft.Crm.Application.Platform.Grid.GridDataProviderQueryBuilder.LoadQueryData()
at Microsoft.Crm.Application.Platform.Grid.GridDataProviderQueryBuilder.LoadData()
at Microsoft.Crm.Application.Platform.Grid.GridDataProviderBase.PrepareGridData()
at Microsoft.Crm.Application.Platform.Grid.GridDataProviderBase.PrepareData()
at Microsoft.Crm.Application.Controls.GridUIProvider.Render(HtmlTextWriter output)
at Microsoft.Crm.Core.Application.WebServices.AppGridWebServiceHandler.GetRefreshResponseHtml(IGridUIProvider uiProvider, StringBuilder sbTemp)
at Microsoft.Crm.Core.Application.WebServices.AppGridWebServiceHandler.Refresh(String gridXml, StringBuilder sbXml, StringBuilder sbHtml, Boolean returnJsonData)
at Microsoft.Crm.Core.Application.WebServices.AppGridWebServiceHandler.ProcessRequestInternal(HttpContext context) —> Microsoft.Crm.CrmException: A quick find filter cannot have any child filters
at Microsoft.Crm.Application.Platform.ServiceCommands.PlatformCommand.XrmExecuteInternal()
at Microsoft.Crm.Application.Platform.ServiceCommands.RetrieveMultipleCommand.Execute()
at Microsoft.Crm.ApplicationQuery.RetrieveMultipleCommand.RetrieveData()
at Microsoft.Crm.ApplicationQuery.ExecuteQuery()
at Microsoft.Crm.Application.Platform.Grid.GridDataProviderQueryBuilder.GetData(QueryBuilder queryBuilder)
at Microsoft.Crm.Application.Platform.Grid.GridDataProviderQueryBuilder.LoadQueryData()
at Microsoft.Crm.Application.Platform.Grid.GridDataProviderQueryBuilder.LoadData()
at Microsoft.Crm.Application.Platform.Grid.GridDataProviderBase.PrepareGridData()
at Microsoft.Crm.Application.Platform.Grid.GridDataProviderBase.PrepareData()
at Microsoft.Crm.Application.Controls.GridUIProvider.Render(HtmlTextWriter output)
at Microsoft.Crm.Core.Application.WebServices.AppGridWebServiceHandler.GetRefreshResponseHtml(IGridUIProvider uiProvider, StringBuilder sbTemp)
at Microsoft.Crm.Core.Application.WebServices.AppGridWebServiceHandler.Refresh(String gridXml, StringBuilder sbXml, StringBuilder sbHtml, Boolean returnJsonData)
at Microsoft.Crm.Core.Application.WebServices.AppGridWebServiceHandler.ProcessRequestInternal(HttpContext context)
— End of inner exception stack trace —
at Microsoft.Crm.Core.Application.WebServices.AppGridWebServiceHandler.ProcessRequestInternal(HttpContext context)
at System.Web.HttpApplication.CallHandlerExecutionStep.System.Web.HttpApplication.IExecutionStep.Execute()
at System.Web.HttpApplication.ExecuteStepImpl(IExecutionStep step)
at System.Web.HttpApplication.ExecuteStep(IExecutionStep step, Boolean& completedSynchronously): Microsoft Dynamics CRM has experienced an error. Reference number for administrators or support: #48A7E659Detail:
<OrganizationServiceFault xmlns:i=”http://www.w3.org/2001/XMLSchema-instance” xmlns=”http://schemas.microsoft.com/xrm/2011/Contracts”>
<ActivityId>fa29912a-47b8-42cf-8e7b-fe3e0c13aecc</ActivityId>
<ErrorCode>-2147220970</ErrorCode>
<ErrorDetails xmlns:d2p1=”http://schemas.datacontract.org/2004/07/System.Collections.Generic” />
<Message>System.Xml.XmlException: Microsoft.Crm.CrmException: A quick find filter cannot have any child filters
at Microsoft.Crm.Application.Platform.ServiceCommands.PlatformCommand.XrmExecuteInternal()
at Microsoft.Crm.Application.Platform.ServiceCommands.RetrieveMultipleCommand.Execute()
at Microsoft.Crm.ApplicationQuery.RetrieveMultipleCommand.RetrieveData()
at Microsoft.Crm.ApplicationQuery.ExecuteQuery()
at Microsoft.Crm.Application.Platform.Grid.GridDataProviderQueryBuilder.GetData(QueryBuilder queryBuilder)
at Microsoft.Crm.Application.Platform.Grid.GridDataProviderQueryBuilder.LoadQueryData()
at Microsoft.Crm.Application.Platform.Grid.GridDataProviderQueryBuilder.LoadData()
at Microsoft.Crm.Application.Platform.Grid.GridDataProviderBase.PrepareGridData()
at Microsoft.Crm.Application.Platform.Grid.GridDataProviderBase.PrepareData()
at Microsoft.Crm.Application.Controls.GridUIProvider.Render(HtmlTextWriter output)
at Microsoft.Crm.Core.Application.WebServices.AppGridWebServiceHandler.GetRefreshResponseHtml(IGridUIProvider uiProvider, StringBuilder sbTemp)
at Microsoft.Crm.Core.Application.WebServices.AppGridWebServiceHandler.Refresh(String gridXml, StringBuilder sbXml, StringBuilder sbHtml, Boolean returnJsonData)
at Microsoft.Crm.Core.Application.WebServices.AppGridWebServiceHandler.ProcessRequestInternal(HttpContext context) —> Microsoft.Crm.CrmException: A quick find filter cannot have any child filters
at Microsoft.Crm.Application.Platform.ServiceCommands.PlatformCommand.XrmExecuteInternal()
at Microsoft.Crm.Application.Platform.ServiceCommands.RetrieveMultipleCommand.Execute()
at Microsoft.Crm.ApplicationQuery.RetrieveMultipleCommand.RetrieveData()
at Microsoft.Crm.ApplicationQuery.ExecuteQuery()
at Microsoft.Crm.Application.Platform.Grid.GridDataProviderQueryBuilder.GetData(QueryBuilder queryBuilder)
at Microsoft.Crm.Application.Platform.Grid.GridDataProviderQueryBuilder.LoadQueryData()
at Microsoft.Crm.Application.Platform.Grid.GridDataProviderQueryBuilder.LoadData()
at Microsoft.Crm.Application.Platform.Grid.GridDataProviderBase.PrepareGridData()
at Microsoft.Crm.Application.Platform.Grid.GridDataProviderBase.PrepareData()
at Microsoft.Crm.Application.Controls.GridUIProvider.Render(HtmlTextWriter output)
at Microsoft.Crm.Core.Application.WebServices.AppGridWebServiceHandler.GetRefreshResponseHtml(IGridUIProvider uiProvider, StringBuilder sbTemp)
at Microsoft.Crm.Core.Application.WebServices.AppGridWebServiceHandler.Refresh(String gridXml, StringBuilder sbXml, StringBuilder sbHtml, Boolean returnJsonData)
at Microsoft.Crm.Core.Application.WebServices.AppGridWebServiceHandler.ProcessRequestInternal(HttpContext context)
— End of inner exception stack trace —
at Microsoft.Crm.Core.Application.WebServices.AppGridWebServiceHandler.ProcessRequestInternal(HttpContext context)
at System.Web.HttpApplication.CallHandlerExecutionStep.System.Web.HttpApplication.IExecutionStep.Execute()
at System.Web.HttpApplication.ExecuteStepImpl(IExecutionStep step)
at System.Web.HttpApplication.ExecuteStep(IExecutionStep step, Boolean& completedSynchronously): Microsoft Dynamics CRM has experienced an error. Reference number for administrators or support: #48A7E659</Message>
<Timestamp>2018-11-21T10:28:58.4053402Z</Timestamp>
<ExceptionRetriable>false</ExceptionRetriable>
<ExceptionSource i:nil=”true” />
<InnerFault>
<ActivityId>fa29912a-47b8-42cf-8e7b-fe3e0c13aecc</ActivityId>
<ErrorCode>-2147217118</ErrorCode>
<ErrorDetails xmlns:d3p1=”http://schemas.datacontract.org/2004/07/System.Collections.Generic” />
<Message>A quick find filter cannot have any child filters</Message>
<Timestamp>2018-11-21T10:28:58.4053402Z</Timestamp>
<ExceptionRetriable>false</ExceptionRetriable>
<ExceptionSource i:nil=”true” />
<InnerFault i:nil=”true” />
<OriginalException i:nil=”true” />
<TraceText i:nil=”true” />
</InnerFault>
<OriginalException i:nil=”true” />
<TraceText i:nil=”true” />
</OrganizationServiceFault>
Gustaf Westerlund
MVP, Founder and Principal Consultant at CRM-konsulterna AB
www.crmkonsulterna.se

by gustaf | Oct 22, 2018
For the first time ever 9 Business Solutions MVP:s will converge on Stockholm to share their knowledge! In the amazing Dynamics 365 Saturday event which will be held on the 10:th of November 2018 at the Microsoft Office in Kista, just outside Stockholm. As usual, the Dynamics 365 Saturdays are free.
As the main organizer, me, my company CRM-Konsulterna and the MVP Jonas Rapp, will also help out it is of course very satisfying to have so many talented people sign up to speak. A lot is happening, and version 9.1 was just rolled out today in EMEA if you didn’t notice. Hence there is a lot to talk about.
There will be three tracks:
- Application – sessions on configuration and usage of Dynamics 365
- Development – sessions on development and configuration that could be viewed as programming like Flow, LogicApps, PowerApps/CanvasApps etc.
- Business/Project Management – sessions on how to best run projects, businesses, your career and other softer issues but all related to Dynamics 365.
As the host, I really hope you are able to secure a seat, we are limiting the amount to 150 and we are getting signups by the hour, so be sure to book your seat now.
Gustaf Westerlund
MVP, Founder and Principal Consultant at CRM-konsulterna AB
www.crmkonsulterna.se

by gustaf | Sep 5, 2018
The server side sync is a technology for connecting Dynamics 365 CE to an Exchange server. When connecting an Online Dynamics 365 to an onprem Exchange there are some requirement that need to be met. These can be found here: https://technet.microsoft.com/sv-se/library/mt622059.aspx
However, I just had a meeting with Microsoft and based on the version shown 2018-09-05, they have now added some new features that they haven’t had time to get into the documentation yet.
Some of the most interesting parts of the integration is that the it requires Basic Authentication for EWS (Exchange Web Service). Of the three types of authentication available Kerberos, NTLM and Basic, Basic Authentication is, as the name might hint, the least secure. Hence it is also not very well liked by many Exchange admins and may be a blocker for enabling Server Side Sync in Dynamics 365.
In the meeting I just had with Microsoft, they mentioned that they now support NTLM as well! That is great news as that will enable more organizations to enable Server Side Sync.
There is still a requirement on using a user with Application Impersonation rights which might be an issue as that can be viewed as having too high rights within the Exchange server. For this there is currently no good alternative solution. I guess making sure that the Dynamics Admins are trustworthy and knowing that the password is encrypted in Dynamics might ease some of that. But if the impersonation user is compromised, then a haxxor with the right tool or dev skills could compromise the entire Exchange server.
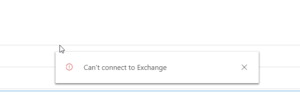
 Microsoft also mentioned another common issue that can arise with the Outlook App when using SSS and hybrid connection to an Exchange 2013 onprem. It will show a quick alert saying “Can’t connect to Exchange” but it will be able to load the entire Dynamics parts.
This might be caused by the fact, according to Microsoft, that Exchange 2013, doesn’t automatically create a self-signed certificate that it can use for communication. Hence this has to be done.
This can be fixed by first creating a self signed certificate and then modify the authorization configuration using instruction found here . Lastly publish the certificate. It can also be a good idea to check that the certificate is still valid and hasn’t expired.
I will see if I can create a more detailed instruction on this later.
Gustaf Westerlund
MVP, Founder and Principal Consultant at CRM-konsulterna AB
www.crmkonsulterna.se


Recent Comments