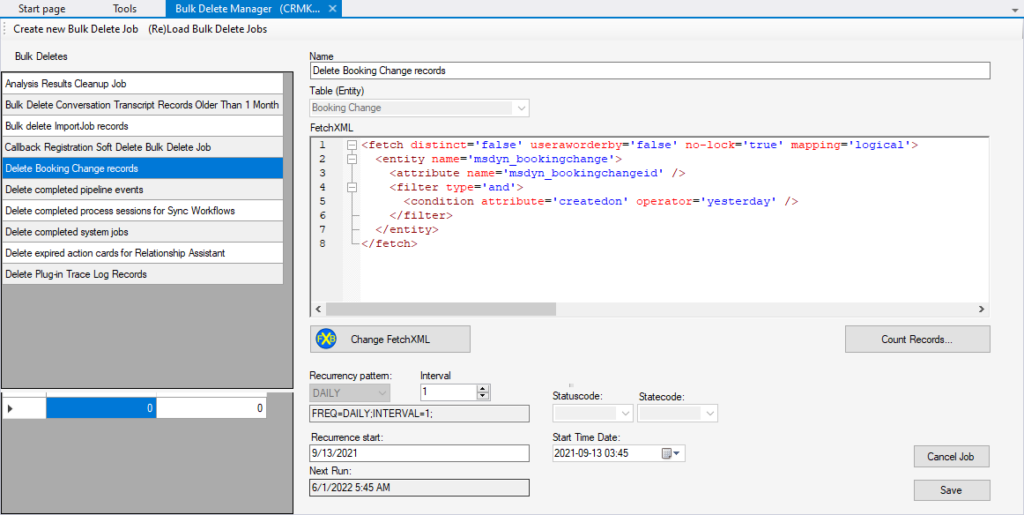
Have you ever tried creating bulk deletes in dataverse/Dynamics 365? It is still a very old interface and it is hard to control the exact definition of what is to be deleted as you cannot see the actual FetchXML that is being used. It is also hard to see existing recurring bulk delete jobs and what FetchXML they are using. Based on these facts, my colleague Ebba Linnea Nilsson and I decided to make our first plugin for XrmToolBox (XTB). We are now proud to announce that it is released and available for free (as usual in XTB). We have also identified a bug in the platform related to this, which I will describe below.
The bulk delete functionality in dataverse and hence in Dynamics 365 CE is an essential function for many organizations. This is especially true since GDPR was introduced and there is a strong legislative requirement to remove personal data that cannot be justified to be stored. There are also other reasons why the bulk delete functionality is more and more important and that is based on the capacity costs that can be inferred on a Power Platform tennant. Firstly just storing data, especially in the database storage in dataverse has a non trivial cost at $40/GB. There is a lot of value per GB, so it might not be justified to say that it is too expensive but removing unnecessary data is definitely something that can be worthwhile especially for larger implementations. I personally work with a customer in the travel retail industry which has millions of customers and some tables have 40M+ records. There are also a lot of integrations and automations causing a lot of data to be created. Data that at some point needs to be removed. As all data should, or there should at least be a conscious decision not to remove it and why if so. As you might be aware, if you have read my other articles in this blog, I have previously used SSIS and Kingswaysoft to remove massive amounts of data. However, now that the API Entitlements will be introduced (6 months after the report for API Entitlements is made Generally Available), we need to start to become more and more restrictive in using the APIs for massive data management, like deletes. Hence, we try to move as much as possible to the built in Bulk Delete.
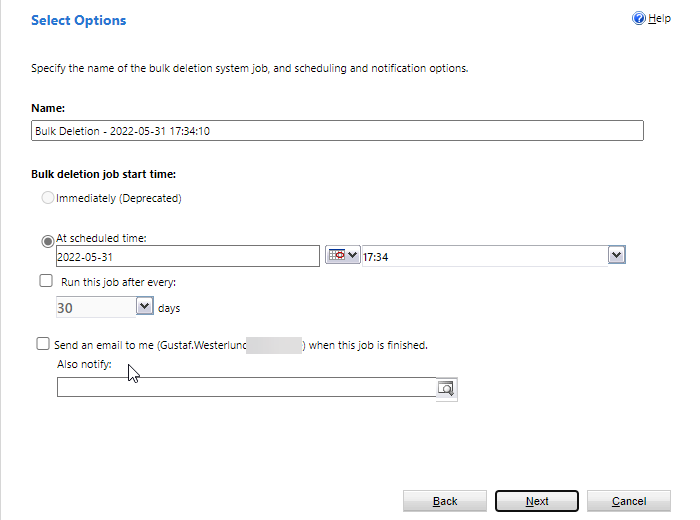
Working with the built in bulk delete functionality is a bit sad. It is very old and you have to click through a wizard kind of experience to be able to set them up. But the most limiting factor is that you cannot see the actual FetchXML of an active recurring bulk delete and you cannot input FetchXML directly into the bulk delete.
The Options page of the Bulk Delete Wizard
Having worked with this wizard you might also have noticed something a bit off. If you create a view which shows all contacts that have no activities. Then this will work when using it in the system like a view. However, if you try to use this view in a bulk delete it will “simplify” this and remove that part of the query. My thought that this was a limitation in the UI based on the fact that it is very old and hasn’t gotten any love for many years (decades). My assumption was hence that creating a bulk delete via the API would allow me to create bulk deletes that were based on FetchXMLs that you couldn’t even input from the UI. These were the reasons for us starting to create this plugin and it was so useful that I used it in debug mode for several weeks before finalizing it and publishing it.
Now we have released the first version and you can download it directly from XTB. I would like to give a huge thanks to Jonas Rapp who helped us out a lot with both connection to his tool FetchXML Builder but also the general setup of the plugins and the details of getting it approved as a Plugin for XTB.
If you have any suggestions, comments or otherwise, leave them on the GitHub repo https://github.com/crmgustaf/BulkDeleteManager or down below. We already have a bunch of stuff we want to do. Ah, yes, and the bug we found, it seems that the outer joins that was a rather recent addon to FetchXML is not supported by the actual platform. Hence the UI and the platform match in that perspective. Just to make it clear, what happens is that you input a FetchXML saying “All contacts with no activities” or something like that, which it will simplify to “All contacts” which is not really what you want.
As it is supported to create bulk delete jobs via the API, I do think that this still can be seen as a bug as there is no clear documentation on this or even a control when creating the bulk delete job with a FetchXML that will be incorrectly parsed. My suggestion is hence to implement the new FetchXML parser in Bulk Delete functionality, at least on the platform side. With the current setup, it is very possible that bulk deletes are created that remove a lot more than what was initially intended which can be very damaging to any organization. And from a GDPR perspective, this type of query is rather common, as it might be definied that contacts with no cases can only be stored for 2 years, but with cases for 10. To remove the ones without the cases, you would make the question “Remove all contacts with no cases with created on > 2 years”. This would then cause all contacts with created on > 2 years to be removed regardless of if it has a case or not.
To inform users of this, we have added a warning, every time a new bulk delete job is to be saved. Hopefully Microsoft will fix this soon.
Yesterday at Ignite, new Entitlement limits were announced and the corresponding Microsoft Docs page was updated: Requests limits and allocations – Power Platform | Microsoft Docs In general I am very positive to these changes as they more closely correspond to the overall goal of what was said to be point of Entitlements.
First of all, the most important fact is that non-licensed users have been upped from 100k to 500k for all Dynamics 365 Enterprise and Professional licenses. On top of that, 5k requests are added per Dynamics USL. Capped to 10M. Hence a small org with 5 Dynamics Pro users will get 500k + 5x5k = 525k requests per 24h. A large org with 1000 Enterprise users will get 500k + 1000x5k = 5.5M. A larger org with 10k enterprise sales users will be capped at 10M requests.
Normal, payed users have also been changed a bit. An enterprise or pro license is entitled to 40k requests. Note that this does not include team member licenses, which are entitled to 6k.
The capacity addon has also been changed to include 50k instead of the previous 10k. If the prices at $50 is still the same, I don’t know at this time. Then this price has been reduced to 20%. I will get back to this later.
This change is good as it will probably cause the majority of the customers to not exceed this. There will probably still be a few larger customers or complex solutions that will exceed and I do suggest that you talk to your partner and your Microsoft account manager to try to arrange something.
There are still some issues that I think need addressing;
How can ISV:s like Click Dimensions which by nature will be rather verbose be able bundle requests?
Larger corporate/global tennants with multiple instances are still punished by this model and would benefit from splitting the one large tennant to several smaller. But that makes it a lot more complex from an IT-perspective and isn’t the point that it is great to keep them all in one?
Licensing is still rather complex from a capacity perspective and that might scare customers. I have talked to customers that have chosen SalesForce just due to this reason.
There is more to be discussed regarding this, but I wanted to give my perspective on this as soon as I could and also put some light on this. I will be back on the subject.
On the page in Microsoft docs where they discuss API Service Protections there is towards the end of the page a part which gives some recommendations. Some are great, like the recommendation to use many threads and remove the affinity cookie, however when I read it I really bounced at the recommendation that batching shouldn’t be used. That just didn’t rime with my experiences of doing heavy dataloads to dataverse. So I thought I might just test to see if it was true or not by creating a simple script in SSIS with Kingswaysoft. My results, using batching compared to not using it gives more than a 10x performance increase. Continue reading to understand more about how I tested this and some deeper analysis.
Parameters and excel
The first thing I did was to create an excel sheet for storing all the results. I really did have to think about the different parameters that could affect the result, so I chose the following columns:
Dataload – how many records. This needed to be a bit larger to make sure that the throttling time of 5 min was passed.
Operation – Different dataverse operation take different amounts of time. For instance, creates are typically rather fast, but deletes, depending on table, can be a lot slower as the platform might execute cascading deletes based on one single delete. For instance, if you remove a contact with 100 tasks connected to it with the regarding relation set to “parental” or “cascade delete” it will actually remove all the 100 tasks. If set to “remove link”, the platform has to make an update to each of the tasks, removing the link. There are also special operations like merge which are rather complex.
Table – There is a large difference between the different tables. Some of the OOB tables have a lot of built in logic and really small non-activity custom tables can be a lot quicker to create, update or delete.
Threads – How many threads were used.
Batch – The size of the batches being used.
Duration / Duration (ms) – Duration is where I input the duration as a normal time. I created a calculation to calculate the corresponding amount of milliseconds.
Time per record (ms) – This is the division of the duration in ms with the total number of records. During this first test, I always used 100 000 records as the dataload, but it could be interesting in the future to see the differences between different dataloads, with all else being the same. This is also the main output from this test.
Strategy – It is possible to have different strategies. In this first version I just ran everything at once, hence I called the strategy “All at once”. Different strategies might be “5 on, 5 off”, meaning that you design the script to run superfast for 5 minutes, the throttling limit, and then stop and do nothing for 5 minutes and then loop this. Not always possible to use that kind of strategy, but for massive deletes of for instance market list members (cannot be removed with bulk delete) that might be an option.
API – There are currently two APIs that can be used. The new WebAPI which uses JSON payloads and the older SOAP API which used XML payloads. It stands to reason that the smaller JSON payload should cause the WebAPI to be faster than the corresponding SOAP API. However SSL encryption also causes the data to be compressed, which might make these differences smaller than expected. There is also a server side aspect to this, as the APIs will run through different parts of the code on the server side which could affect the performance.
No of columns – How many columns are being sent to the API. Of course there would be a difference if you send a create message with 3 columns compared to 30. Hence this is a relevant point. It is still a bit rough, as there is a huge difference in creating a boolean record, a 2000 character nvarchar or a lookup. This could also be something that was adapted.
Existing records – How many records existed in the system prior to running this? Not sure if this makes any difference, in other words, everything else equal, would it take more time to write 100k records to a system with 0 records or one with 10M records? As I don’t know, and cannot rule it out, I added it.
Latency (ms) – Daniel Cai, Founder of Kingswaysoft, always recommend that the SSIS script with Kingswaysoft be run “as close as possible to the dataverse”. That does in other words imply that the latency to the server affect the performance. Do calculate this, I used diag.aspx from the computer running the script.
Location – Which geo is the instance located in. This is more for general information, the latency is really the important factor here. The throughput might also have some affect if you are using a really bad line to the dataverse. I was using a wired 1 GBit line. In this test, I was using an instance I got hold of as MVP, which is located in the US and my own stationary computer at home (a AMD Ryzen 9 3900X 12-Core Processor 3.79 GHz with 32 GB of memory). Hence the latency was rather high and not in line with Daniel Cai’s recommendations. It is hence also something to investigate further.
No of users – As I, and some others in the community have described, throttling is based on a per-user and per-front end server basis. Hence utilizing several service principals/application users can effectivly multiply the throughput. In this test I used just one.
Instance type – It is well known that sandbox instances do not have the same performance as a production instance. If you find Microsoft support on a happy day and you are working with a larger (no of licenses) instance, you might also get them to relax the throttles a bit, especially if you mention that you are doing a migration. As these factors strongly affect the performance of large dataloads, I did have to add this. During this test I was using a non-enhanced production instance, in other words, a production instance on which no throttles had been relaxed.
DB Version – The final parameter that I thought might affect this is the actual version of the dataverse instance. As improvements and god forbidd sub optimal “improvements”, can cause enhancements or degradations of the performance, this is necessary to document.
SSIS/Kingswaysoft setup
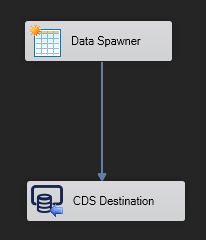
For setup of create tests in SSIS with the Kingswaysoft addons I used a dataspawner (productivity pack) to generate the data. I then just sent this directly to the CDS Destination.
And the Data Spawner config:
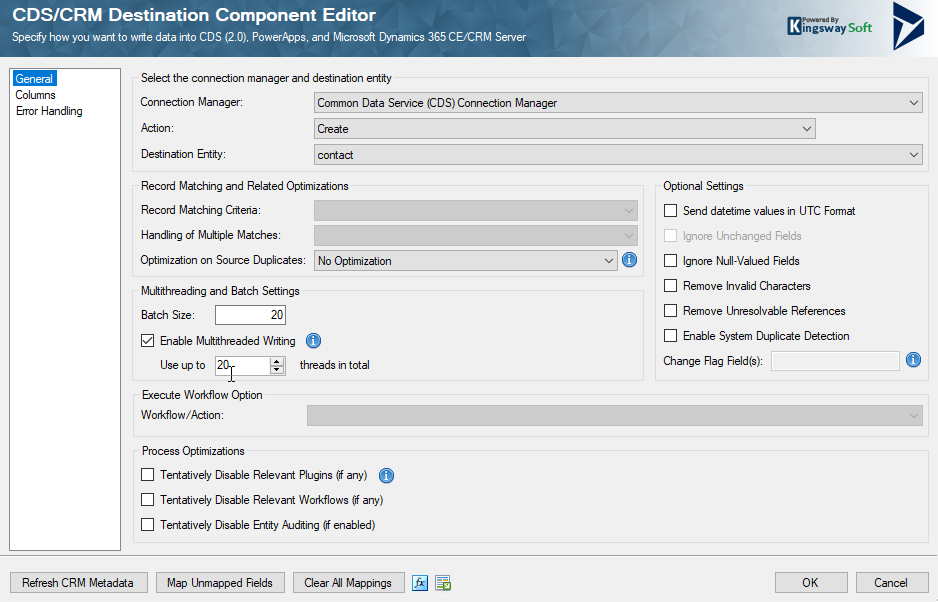
And the CDS Destination config
The main changes done in this case were to the parameters “Batch size” (set to 20 in the picture above) and how many threads to use (also set to 20 in the picture above).
After each run, I checked the log from SSIS to see how long the entire process took. Due to the fact that I have a computer with many threads and for this case, enough memory, it is my perception that most of the threads allocated were also used.
Results
What are the results? This is a picture of the excel:
As you can see I did try both Create and Delete operations, but the results are rather obvious.
20 threads/20 per batch of both create and delete, took around 45 minutes
Reducing to 16/10 made only a minor difference – 48 minutes
Microsofts recommendation of not using batching, ie 20 threads/1 batch – took over 10 h, both for delete and create.
Using only 1 thread with 1 batch was more or less the same as using 20/1
1 thread with 20 in every batch (1/20) took almost 5 h, which is around half the 1/1 or 20/1
I think the results clearly show, that Microsoft docs are currently incorrect in their recommendation to not use batching. Perhaps they will update this soon. From an entitlement perspective, one needs to understand the additional cost of the “batch unpacking” request that is made. With 20 in every batch, this is an overhead of 1/21 but if you would lower the batches to 4, it would be 1/5. Hence using as large batch as you can, without loosing performance, is generally what I would recommend.
As I have implied in this article, there are a lot of other parameters to investigate in the API. I have a hunch that a create with 10 lookups compared to 10 textfields, will also make a significant difference, but I will need to test it.
Also do consider the request timeout. When working with complex and large batches, one request may taker quite some time. You will know, however, as it will return a timeout exception if you exceed it. Note that some records in that batch may have been written anyway. Just that your client wasn’t waiting around for the answer.
I do also encourage others to try out other parameters in the API. What is really optimal from many different aspects. From a mathematical perspective this can really be seen as a multidimentional surface where we are attempting to find the highest points. I have now started this journey, and I hope it was an interesting read. Please leave a comment, if you have any experience to share or just want to comment.
I was recently in charge of a large migration. It all went fine but not without hickups that typically are connected to moving large amounts of data to dataverse. We were using SSIS with Kingswaysoft and ended up using a local SQL database as staging database too. This article will discuss the different lessons learned and give some concrete tips when doing similar migrations.
One of my more popular articles is the article that describes how to optimize the writing of data to Dataverse/CDS. If you are working with migration of large amounts of data, as I will be describing here, I do suggest you have a look at it: https://powerplatform.se/fast-data-management-in-a-limited-cds-world/. I will not discuss those concepts in any detail here but we did use all aspects mentioned in that article.
I recently was in charge of a migration which used CSV-file exports from an old German system (with German field names!) which had many millions of records, in both large tables like “Contact” and “Sales Order”. However, the system we migrated from had a completely different data modell than the one used in Dynamics. For instance, each row describing a “Flight” had to be divided into two rows, one for the outgoing flight and one for the homecoming flight, in the order detail table. We also had to create a lot of related data which was referenced from the “Flight” table, for example location, agent and brand. In other words, there was quite a lot of heavy transformations going on and a lot of logic involved, such as change format on the old data to match the Dataverse model and apply rules to resolve old issues, such as bugs.
Initially we only got a quite small subset of the entire database load, and we started our migration journey by creating all the migration logic in SSIS (which facilitates the script and makes updates easy to handle). The script did include some functions that “joined” rather large tables, both from the CSV files but also related data fetched from the Dataverse based on primary and alternate keys. I was clear with the customer from the very beginning that I wanted a full export with the same amount of data that we could expect in the final migration, mainly for the opportunity to stress-test the SSIS script before the migration to the production environment took place and after a while we got the big files…
…And this was when the excrement hit the wind generator. The afore mentioned lookups just stalled forever. We noted that having a lookup (using Kingswaysoft Premium Lookup) works fine on a computer with 16 GB memory up to a few 100k of records. However, once the data starts reaching 500k and more, it just stalls forever (and don’t even get me start on the sort tools…). Not sure exactly if it would have been possible to fix this by adding more cores and memory, we didn’t try. We hence had to rewrite the script and implement a staging database instead. What we found, is that a dataflow with 1M+ records of lookups will be 100x faster if you import the data into SQL and do a join instead. Lookups still works for smaller tables and I am not against them per se, as they do make the migration simpler. Adding more tables to a migration database will increase complexity, and if you want to add a column in a table, that table do not only has to be added to one SSIS dataflow, but probably a few more. And you also must do an ALTER TABLE in SQL to add the field there too. It is therefore important to have a good mapping set before you start to create the script. And keep the complexity as simple as possible. You can also use SQL tasks in the migration script to update the tables straight after you read them to the staging database per automation, if you need to apply some kind of rules after the read to the staging database, and find it easiest with an SQL query.
The method we used for developing the migration was to first make a “skeleton” migration, based on the target data model. In other words, we started with trying to get a few of the easiest fields, not all, from all tables that was to be involved in the migration – maybe it could be called – model-first-approach, instead of starting with one table, completing this and then moving on to the next. The advantage of the model-first-approach is that you quite early can start some tests on the data, for instance setting up some quantitative test by checking in the source system for the quantities of contacts and then comparing these quantities to the target. The tests can typically be done by other people than the people building the migration scripts and hence this methods scales a lot better than table-by-table-approach. It is also possible for several devs to work in parallell with different tasks. Typically the more senior will build the skeleton and then more junior can add fields by field to each respective table. A negative aspect of this approach is that it requires a lot of re-loads (keep in mind that this was a first migration, so there are no prior data in the Dataverse that we needed to consider) and re-mapping. And it may be easier to “fall out of” the structure, if you just need “to add a little bit here and there”. It is however indeed hard to go table for table, especially with related data. If you already have a lot of live data, you should think about a way to easy identify the migrated data so you can bulk-deleted. And do not forget to engage the client early with raised questions and the mapping to make sure you have understood everything correctly and avoid unnecessary errors.
We also tried to create unique row identities that strictly was based on the source data. This is very useful as that allows for delta-migration, or to continue where we left off in case of a problem. Let’s say for instance that you want to migrate 3 million contacts. If, after 2.1 Million contacts the script breaks for some reason, it is good to be able to continue at 2.1M instead of restarting. In this case we didn’t use modifiedon-date to be able to do a full delta migration logic but it is certainly possible. For this we used the cache-transforms, easily fetch the already migrated data (if any) with the unique and sort out the already migrated data if it matched the key.
Another pattern that we used was that, after creating a specific record, like contact, we reimported the recordid (in this case contactid) together with the legacyid. This allowed us to directly join with this table when later adding tables with dependencies like lookups towards the contact table, could be joined with this mapping table so that we directly got the contactid when querying the related table.
Tips
When migrating from CSV, import them directly as source tables in the staging database. That way, in case you need to fix something, you have a good reference for quantities.
Get an example of the full data load as early as possible. A script that works for a subset might not work at all for the full dataload as was the case for us.
Automate as much as possible. Don’t use any hardcoded values that are environent specific, such as transactioncurrencyid, but rather read these to small tables or to SSIS variables. Use SQL Truncate to remove all data quickly in a table, and make this part of the SSIS script as an SQL task at the appropriate stage.
Always check the quantities. How many rows in source data, how many rows after a match and check if it differs so you very early can identify bugs in your script that might be the reason for dropping rows. For example, you might use a JOIN when you should use an OUTER JOIN. Always check the total number and see if it is what you expect. Watch out for duplicates, and always check so your unique IDs (if you got some from the source data) really are unique and not NULL. Do note that if you have duplicates, that you join on, that will create multiplications. Hence it is possible, after a select-statement with joins to get more records that the initial table.
Define reasonable goals and test cases for the migration. Some examples:
99.9% of all contacts to be migrated correctly. With 1 M records, this means that anything lower than 1000 incorrect migrated contacts/missed, is defined as still ok.
Randomly pick 10-20 records on a base level, like 20 customer, and then compare these in the UAT/Test environment to the source system, as it is seen there. This needs to be done by the business people, so that they can have a say if the migrated data is fine.
Select some filters, like “all customers in Munich” and some other segmentations and compare source system to destination. If there are large amounts of errors, backtrack to the staging database to see where you did loose some records or created too many (not uncommon).
Complete entire transformation to destination tables in the staging db. Then you can move directly from there to dataverse. This is particularly important when moving large quantities of data when managing the data in SSIS can be problematic.
Make sure to have unique identifiers on all tables that preferably can be regenerated from the data. Store these in some “Legacy ID” field. This allows for delta-migration logic, ie. where part of the data is migrated and then the rest later. If you have some issues during one of the dataflows, and it stops on 3 230 234-th record of 6 M, you can continue from there and you don’t have to redo it all. If there is no decent way of getting a legacy id, you can generate classic row numbers by creating an identity column. This will make the migration utilize this, but only within that particular instance and load of the staging db. Hence you must be careful everytime you reload the database.
Utilize the backup-restore functionality of the dataverse environments. Do note that you can make manual backups just before you start migration. If you have a production environment, this will need to be converted to a sandbox environment before you can restore to it. Another option I got from a colleague was to use 3 different environments, with temporary names, and then just rename the final one when done.
Once you have transfered an entire table to the source system, it is typically very useful to have a mapping table, with just the table record id and the legacy id. So for instance, after migrating Contact, read all contacts from dataverse with the contactid and the legacy id. That way, when later migrating “salesorders”, which identify the customer by legacy id, it is easy to just join with this table to get the contactid.
Production environments are faster. Fastest is to ask Microsoft Support to relax throttles on all environments that are used during migration.
Use a VM that is located geographically (or really with low latency and high throughput) to where the environments are hosted. This is a very common recommendation by Kingswaysoft too.
The settings for number of threads and batch size needs to be set based on some factors, namely:
Production/Sandbox
Have throttles been relaxed
Size of payload (ie how many columns) – larger payload -> smaller batches.
Type of action – creates are faster than deletes. Updates are in-between.
I hope these tips can help you along. If you have any comments or you have other experiences in this subject, don’t hesitate to leave a comment.
During this migration and the writing of this article, I had excellent help from my highly intelligent colleague Ebba Linnea Nilsson and it is certainly true that two heads are better than one, and the end result is often a lot better than just the sum of two people. So for my final recommendation, make sure to have a good colleague with you to help you out, as you most probably will run into some issues and having someone to discuss with is really great!
(Updated) Microsoft recently released some throttling that have been causing some stir in the community, especially since the latest throttle, the concurrency throttling, was not very openly announced, some partners and customers were hit rather hard by it as it affected their abilities to manage large dataloads in the system.
Now Microsoft have announce another API based limitation which is based on the users and the type of licenses the have. You can read some about it here if you like. This article will discuss what this means and my personal view of the good, the bad and the ugly of it.
First of all we need to understand what it is. It is a API limit that will be set per user and based on the type of license that the user is allocated. The highest is if you have a Dynamics 365 App user license, like Sales, Customer Service or similar, which will give you 20 000 requests per 24 hours. The lowest is a Power App – Per App license which will give you 1 000 requests per 24 hours. Note that these are connected to the user and not summed/aggregated to the instance level (allthough I would think that would be a good idea). Well, really, the lowest of them all are Application, Non-interactive or admin-users that don’t use a license as these will be allocated 0.
I have not seen any UI for this yet, so I don’t know how this will look, but what the page is saying is that API-calls can be reallocated from normal users to application users/non-interactive users. (UPDATE – See update at the bottom regarding this, thank you observant readers!) Not sure if it will also be possible to reallocate API-calls between normal user and another normal user.
There will also be an additional SKU for buying 10 000 additional API calls per day that can be allocated to a user.
The Good
What is good about this then you might ask? Well, I think it is fair. Large customers pay a lot of money for their instances and usually use it a lot with a lot of integrations. It is only fair that they are allowed to use the API:s more than a small customer who has created some super duper application that blasts Dynamics with massive amounts of calls. The small customer can still do this, but they just have to pay a bit extra for those API-calls if they arn’t covering that with their users. I also hope that this might enable Microsoft to relax the currently rather tight throttling on the API:s a bit.
According the the licensing documentation in general, existing customers will not be hit by this until October 2020, in other words, more than a year from now. This will hence probably only now affect new customers.
The bad
This implementation certainly has some bad parts. The most obvious is the too stringent connection to users which makes it weird. I don’t know how this will be managed in the UI but let’s say we have an instance with 500 users mixed Sales Enterprise, Customer Service Professional and Team Member. We also have 10 application users that are used for Portals, Forms Pro and custom integrations to many other systems. Each integration using a separate integration user to reduce the attack area in the unlikely event of a hacker attack. So what we will need to do is to first figure out how much API-usage we are using for all the normal users (for instance via PCF:s, Flows, Plugins, Workflows etc) and all the integration application users. Currently the https://admin.powerplatform.microsoft.com does not give us this granularity. There are indications but in this case one would need deep granualar data, preferably with trend analysis.
Another part of this that could be done better is the “buying addional API-calls”. Why not just adapt the method used in Azure? In other words, you pay as you go. With this current method, you have to know beforehand how much a particular user will use and if you overshoot the user will be shut down causing unnecessary support costs for customers, partners and Microsoft.
I also wonder how this practically is going to be handled? Are admins going to go into each of the 500 user records, reduce the API-calls allocated and move to Application users? If the admin moves all calls, which effectivly will stop plugins, workflows, javascripts with server calls etc how will the error handling of that look?
The Ugly
What is really the difference between something bad and something ugly? I would say that something bad is a design decision that we might dislike or might be disadvantage to the customers, it requires some sort of conscious perspective. Ugly on the other hand is the parts where where, in this case, Microsoft just have forgotten to think about something or neglected perspectives which causes issues for partners or customers. Based on this, I would say that the following are the bad aspects of this;
Timing
Again Microsoft are rolling out a change with a rather short timeframe. They probably feel that a month or two of notice by publishing the article above is notice enough, but they have to realize that many customers cannot act that fast. If you are a small customer with extensive use of Dynamics, for instance if you are using Dynamics 365 in a B2C aspect with a Marketing Automation integration and you are targeting millions of customers with sendouts and hits on your webpage being mirrored to your Dynamics all the time, this will cause some hefty API traffic. And your org might not be very big if you are totally e-commerce oriented.
Maybe only new customers, for now
Lastly I really hope that it is true that the API limitation will not affect current customers, it is not very clear and hence we are left in the dark again. If there is a problem with application users etc not being able to log in, I hope Microsoft support will be ready for the storm that will hit them.
On the other hand, new customers might have tested the system, evaluated the costs and are now faced with this. Not sure that will be optimal either, there is risk of loosing a customer or two there.
Communication
As this is a rather drastic change and may be viewed as a “breaking change” if not the one year grace period mentioned in the licensing in general applies to this. No matter, this should have been communicated very clearly months ahead to remove any kind of doubt from partners and customers. Both via blogs, emails to admins of organizations using Application users/non-interactive users as this should be easy to figure out via telemetry. Currently no one knows exactly when this will hit them/their customers or how they are to manage it.
This is generally very unclear. I shouldn’t have to write an article like this, speculating about what is or isn’t going to happen. If I have problems figuring this out, being an MVP, customers are probably very much in the dark, both existing and new.
Conclusion
In conclusion I think this is a good idea that got rushed. It should have been passed through a couple of more hoops before being launched to get the right feedback. The main things that I think Microsoft should change before rolling this out that, from my perspective, still give the same effect, are:
Aggregate all API-Calls that are counted to a per instance level. It will make it easier to manage, stop the breaking change and make it easier to understand.
Enable admins to add a per-use, after the fact, payment option, (like Azure) for any additional API-calls.
If this is going to be useful or not also is very dependent on the fact that we can reallocate a lot of the API-calls from users to the integration users. For instance, I have a B2C customer with 1M+ API calls per 24/h and if it will not be possible to take the sum of hundreds of users and allocate those to the application users we are using, then this will be a very hurtful change.
In the meantime, I do recommend that you keep a close eye to what is going on within this area as it will most likely affect you if you are running any application accounts, which you probably are, like Dynamics Portal, Forms Pro, Voice of the Customer and many more. If you go into the list of users and change view to “Application users” (or whatever it might be called in your language) you will see the list. I think Micrsoft will make some changes, or some announcements to this before October 1. Let’s see what.
Update 2019-09-04
There has been some chatter going around regarding this and do note the comments below which include interesting links and good thoughts. There are some additional points that need to be pointed out. Instead of changing the original article I will continue to add updates like these.
Normal UI usage will count
Initially I did not think that normal UI usage would count towards the API request calls. With “normal” in this case, as an old Dynamics 365/CRM geek, I of course mean a model driven App, but the same also goes for canvas Apps or actually any use of the CDS, what so ever. What this will mean when a user runs out of API requests, will be interesting to see. How many requests are used when the application is used, of course depends a lot on what you do. If you switch on F12 in Chrome you can check the network traffic and see for yourself.
Batching will be your friend
Using batching will from now on not only be a general best practice but also make you save money. If you use tools like Kingswaysoft this is easy to configure, to make sure that you have large batches when for instance doing CUD calls. When writing code directly, you will need to understand how to do this directly. Note that sometimes this will require entire rewrites of the code. I have seen programs off the shore of Orion that you wouldn’t believe with tons of single queries instead of one single call. Most often written by devs who have no or very little experience of writing code towards Dynamics 365/CDS.
Unclear if possible to move API-calls
As several people here and on Twitter have commented, it is probably incorrect to interpret that API:s can be moved from normal users to application users and non-interactive users. This will cause major headaches for some customers which will be struck with lots of additonal costs. Costs that are not very welcome as the per GB cost recently increased 800% hurting especially the larger customers with massive integrations and extensive use of the system. I do, for instance, have a customer that exceeds 1M requests per day 365 days a year. This would require them to buy over 100 addon 10k API requests SKU:s, despite the fact that their 500 users gives them a total of over 5M requests per day, something they will not be using through the UI unless someone is drinking very large amounts of coffee. – NEW Update: This was an incorrect interpretation. You cannot reallocate API calls from normal users.
The price is here
The price for the 10k/24h SKU will be $50/month. This means that for a customer like mine having major integrations causing around 1M API-calls per day, this would cost an additional per month $5 000 or yearly $60 000. I sincerely hope they will relax the throttling to make it worth it. If/when they do, I will read my Macciavelli again.
Update 2019-09-05
First of all I will write a new blog article on this, when the dust settles and we know what is going on. Currently there are quite a lot of unknowns and I wouldn’t be surprised if Microsoft announced a thing or two soon. I have been told that the FAQ will be updated in a couple of days.
Batching – again
There were some discussions on if batching actually were going to be useful in this case or not. I have now gotten confirmed that a batched request will be considered as one (1) call. This is both for batched Creates/Updates/Deletes and Queries of multiple records (that would be very strange if it wasn’t one record, but I had to ask).
Data Export Service etc.
Data Export Service and other services that run under the system account will not count towards the API request. This is good news as this opens up for many users to be able to use this method to offload the API:s for reads.
What is the competition up to
I checked to see how SFDC are handling this and as far as I can see they have a similar setup as can be read here:
I am no expert on their licensing model, but I think it is good to know that this isn’t just a PowerPlatform thing. However, there are some distinct differences:
The API calls are not counted for normal browser/client usage. Only “real” API calls.
They have real enforcement blocking an entire instance/org if they overshoot
All API:s per user license are summed up to the org level
Microsoft Addon apps will include request
If you buy Dynamics Portals, this will include some additional licenses. The same goes for Forms Pro. Hence there should be some default API request assignment to those application users that are installed. I do wonder if it would be financially beneficial to piggyback on those application users? There is also no current method for ISV:s to bundle API-requests into their product if they install an application user upon installation.
CSP / Distributor silence
We have still heard nothing of the 10k addon SKU from any distrubutor, EA or CSP. It will be interesting to see if it will reach the entire distribution chain by October 1 when customers will start being notified that they are in violation (new customers).


Recent Comments