Large migration – lessons learned

Large migration – lessons learned

I was recently in charge of a large migration. It all went fine but not without hickups that typically are connected to moving large amounts of data to dataverse. We were using SSIS with Kingswaysoft and ended up using a local SQL database as staging database too. This article will discuss the different lessons learned and give some concrete tips when doing similar migrations.

One of my more popular articles is the article that describes how to optimize the writing of data to Dataverse/CDS. If you are working with migration of large amounts of data, as I will be describing here, I do suggest you have a look at it: https://powerplatform.se/fast-data-management-in-a-limited-cds-world/. I will not discuss those concepts in any detail here but we did use all aspects mentioned in that article.

I recently was in charge of a migration which used CSV-file exports from an old German system (with German field names!) which had many millions of records, in both large tables like “Contact” and “Sales Order”. However, the system we migrated from had a completely different data modell than the one used in Dynamics. For instance, each row describing a “Flight” had to be divided into two rows, one for the outgoing flight and one for the homecoming flight, in the order detail table. We also had to create a lot of related data which was referenced from the “Flight” table, for example location, agent and brand. In other words, there was quite a lot of heavy transformations going on and a lot of logic involved, such as change format on the old data to match the Dataverse model and apply rules to resolve old issues, such as bugs.

Initially we only got a quite small subset of the entire database load, and we started our migration journey by creating all the migration logic in SSIS (which facilitates the script and makes updates easy to handle). The script did include some functions that “joined” rather large tables, both from the CSV files but also related data fetched from the Dataverse based on primary and alternate keys. I was clear with the customer from the very beginning that I wanted a full export with the same amount of data that we could expect in the final migration, mainly for the opportunity to stress-test the SSIS script before the migration to the production environment took place and after a while we got the big files…

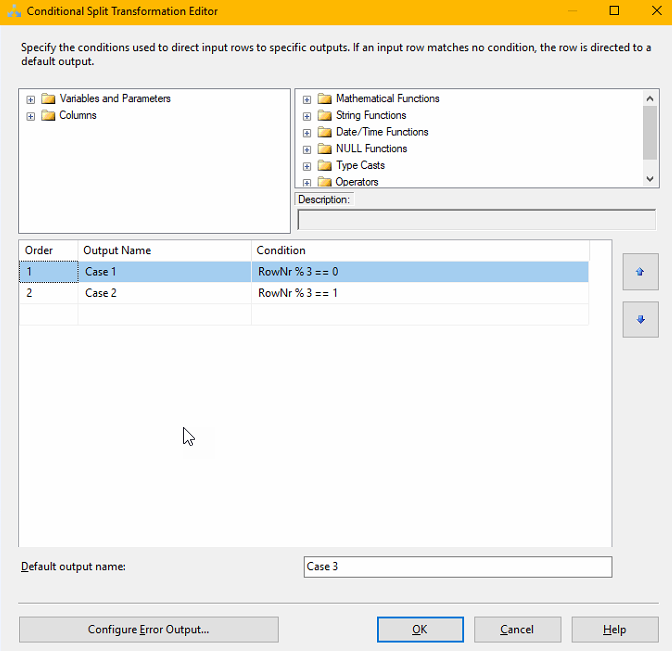
…And this was when the excrement hit the wind generator. The afore mentioned lookups just stalled forever. We noted that having a lookup (using Kingswaysoft Premium Lookup) works fine on a computer with 16 GB memory up to a few 100k of records. However, once the data starts reaching 500k and more, it just stalls forever (and don’t even get me start on the sort tools…). Not sure exactly if it would have been possible to fix this by adding more cores and memory, we didn’t try. We hence had to rewrite the script and implement a staging database instead. What we found, is that a dataflow with 1M+ records of lookups will be 100x faster if you import the data into SQL and do a join instead. Lookups still works for smaller tables and I am not against them per se, as they do make the migration simpler. Adding more tables to a migration database will increase complexity, and if you want to add a column in a table, that table do not only has to be added to one SSIS dataflow, but probably a few more. And you also must do an ALTER TABLE in SQL to add the field there too. It is therefore important to have a good mapping set before you start to create the script. And keep the complexity as simple as possible. You can also use SQL tasks in the migration script to update the tables straight after you read them to the staging database per automation, if you need to apply some kind of rules after the read to the staging database, and find it easiest with an SQL query.

The method we used for developing the migration was to first make a “skeleton” migration, based on the target data model. In other words, we started with trying to get a few of the easiest fields, not all, from all tables that was to be involved in the migration – maybe it could be called – model-first-approach, instead of starting with one table, completing this and then moving on to the next. The advantage of the model-first-approach is that you quite early can start some tests on the data, for instance setting up some quantitative test by checking in the source system for the quantities of contacts and then comparing these quantities to the target. The tests can typically be done by other people than the people building the migration scripts and hence this methods scales a lot better than table-by-table-approach. It is also possible for several devs to work in parallell with different tasks. Typically the more senior will build the skeleton and then more junior can add fields by field to each respective table. A negative aspect of this approach is that it requires a lot of re-loads (keep in mind that this was a first migration, so there are no prior data in the Dataverse that we needed to consider) and re-mapping. And it may be easier to “fall out of” the structure, if you just need “to add a little bit here and there”. It is however indeed hard to go table for table, especially with related data. If you already have a lot of live data, you should think about a way to easy identify the migrated data so you can bulk-deleted. And do not forget to engage the client early with raised questions and the mapping to make sure you have understood everything correctly and avoid unnecessary errors.

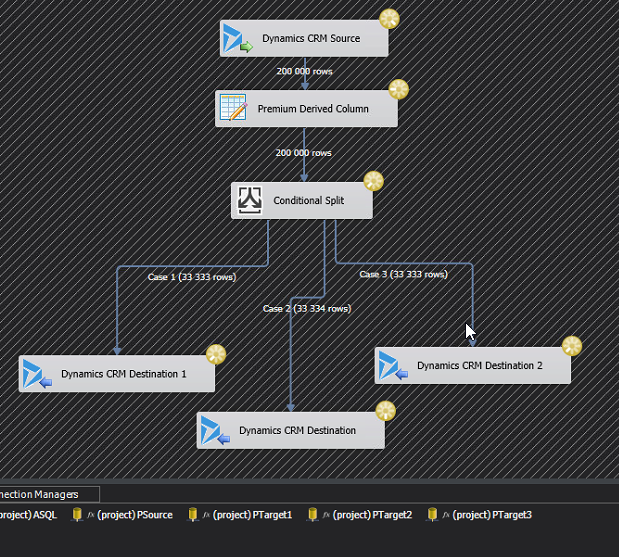
We also tried to create unique row identities that strictly was based on the source data. This is very useful as that allows for delta-migration, or to continue where we left off in case of a problem. Let’s say for instance that you want to migrate 3 million contacts. If, after 2.1 Million contacts the script breaks for some reason, it is good to be able to continue at 2.1M instead of restarting. In this case we didn’t use modifiedon-date to be able to do a full delta migration logic but it is certainly possible. For this we used the cache-transforms, easily fetch the already migrated data (if any) with the unique and sort out the already migrated data if it matched the key.  

Another pattern that we used was that, after creating a specific record, like contact, we reimported the recordid (in this case contactid) together with the legacyid. This allowed us to directly join with this table when later adding tables with dependencies like lookups towards the contact table, could be joined with this mapping table so that we directly got the contactid when querying the related table.

Tips

  • When migrating from CSV, import them directly as source tables in the staging database. That way, in case you need to fix something, you have a good reference for quantities.
  • Get an example of the full data load as early as possible. A script that works for a subset might not work at all for the full dataload as was the case for us.
  • Automate as much as possible. Don’t use any hardcoded values that are environent specific, such as transactioncurrencyid, but rather read these to small tables or to SSIS variables. Use SQL Truncate to remove all data quickly in a table, and make this part of the SSIS script as an SQL task at the appropriate stage.
  • Always check the quantities. How many rows in source data, how many rows after a match and check if it differs so you very early can identify bugs in your script that might be the reason for dropping rows. For example, you might use a JOIN when you should use an OUTER JOIN. Always check the total number and see if it is what you expect. Watch out for duplicates, and always check so your unique IDs (if you got some from the source data) really are unique and not NULL. Do note that if you have duplicates, that you join on, that will create multiplications. Hence it is possible, after a select-statement with joins to get more records that the initial table.
  • Define reasonable goals and test cases for the migration. Some examples:
    • 99.9% of all contacts to be migrated correctly. With 1 M records, this means that anything lower than 1000 incorrect migrated contacts/missed, is defined as still ok.
    • Randomly pick 10-20 records on a base level, like 20 customer, and then compare these in the UAT/Test environment to the source system, as it is seen there. This needs to be done by the business people, so that they can have a say if the migrated data is fine.
    • Select some filters, like “all customers in Munich” and some other segmentations and compare source system to destination. If there are large amounts of errors, backtrack to the staging database to see where you did loose some records or created too many (not uncommon).
  • Complete entire transformation to destination tables in the staging db. Then you can move directly from there to dataverse. This is particularly important when moving large quantities of data when managing the data in SSIS can be problematic.
  • Make sure to have unique identifiers on all tables that preferably can be regenerated from the data. Store these in some “Legacy ID” field. This allows for delta-migration logic, ie. where part of the data is migrated and then the rest later. If you have some issues during one of the dataflows, and it stops on 3 230 234-th record of 6 M, you can continue from there and you don’t have to redo it all. If there is no decent way of getting a legacy id, you can generate classic row numbers by creating an identity column. This will make the migration utilize this, but only within that particular instance and load of the staging db. Hence you must be careful everytime you reload the database.
  • Utilize the backup-restore functionality of the dataverse environments. Do note that you can make manual backups just before you start migration. If you have a production environment, this will need to be converted to a sandbox environment before you can restore to it. Another option I got from a colleague was to use 3 different environments, with temporary names, and then just rename the final one when done.
  • Once you have transfered an entire table to the source system, it is typically very useful to have a mapping table, with just the table record id and the legacy id. So for instance, after migrating Contact, read all contacts from dataverse with the contactid and the legacy id. That way, when later migrating “salesorders”, which identify the customer by legacy id, it is easy to just join with this table to get the contactid.
  • Production environments are faster. Fastest is to ask Microsoft Support to relax throttles on all environments that are used during migration.
  • Use a VM that is located geographically (or really with low latency and high throughput) to where the environments are hosted. This is a very common recommendation by Kingswaysoft too.
  • The settings for number of threads and batch size needs to be set based on some factors, namely:
    • Production/Sandbox
    • Have throttles been relaxed
    • Size of payload (ie how many columns) – larger payload -> smaller batches.
    • Type of action – creates are faster than deletes. Updates are in-between.

I hope these tips can help you along. If you have any comments or you have other experiences in this subject, don’t hesitate to leave a comment.

During this migration and the writing of this article, I had excellent help from my highly intelligent colleague Ebba Linnea Nilsson and it is certainly true that two heads are better than one, and the end result is often a lot better than just the sum of two people. So for my final recommendation, make sure to have a good colleague with you to help you out, as you most probably will run into some issues and having someone to discuss with is really great!

Good luck on your migration challenge!

Fast data management in a limited CDS world

Fast data management in a limited CDS world

In May 2019 Dynamics 365 CE/CDS enacted some new throttling mechanisms that have caused some headaches for anyone wanting to manage a lot of data in CDS (I will refer to Dynamics 365/CDS as just CDS below). There are several different throttles but the one that has cause me most trouble is the concurrency throttle. Kingswaysoft will release support for handling this in the next release and you can also request a special version from them if you ask nicely. In the meanwhile this post can give you some help on how to work as fast as possible using application user mulitplexing and a loop with a 5 min wait to make sure that the throttles are reset.

The new throttling on the main CDS API, as described here: https://docs.microsoft.com/en-us/dynamics365/customer-engagement/developer/api-limits needs to be carefully considered when doing heavy data manipulations in the CDS. One of my customers has a large system with numerous integrations of which the most data heavy are the Marketing Automation systems and the booking systems. And yes, this is Business to consumer.

With the new per GB pricing, keeping the database as small as possible has become an essential task and using the bulk delete just doesn’t work for large data loads, at the time of writing this article. I do hope that Microsoft increase the speed of it so that it does become more useful but currently its speed is somewhere around 1-2 records per second.

The bulk delete also has limitations on that it can only base it selections on a query, i.e. a FetchXML. Often this is not enough, for instance when you want to remove “All emails except those that have any connection to either a case or a contact which has a case”.

For these reasons I almost always opt for using SSIS with Kingswaysoft connectors to CDS when working with complex data management. This article will be on how to get some performance now that there is tougher throttling to take into consideration.

User multiplexing

As the throttling is measured on a “per user”, one trick is of course to use multiple users and spread the load over all these users. You can, of course use normal users, but that will cost you licenses so the smart person will of course use application users instead. If you don’t know how to create application users in Dynamics 365, check it out here: https://docs.microsoft.com/en-us/dynamics365/customer-engagement/admin/create-users-assign-online-security-roles#create-an-application-user . In the example below, I will be using four different application users, one as the source account and three as destinations. The reason for this is that it is typically easier to read several thousand rows per request, but seldom efficient to do batch creates/writes/deletes of more than 10-20.

To do this with SSIS/Kingswaysoft you should start by setting up the connections. In this case, the four CDS/CRM connections and use the OAuth auth-type like below. 

As you might want to have several packages in the same project and have them share the connections, it may be a good idea to use project connections. I also use an Azure SQL db for logging any errors. Previously I used to use CDS but now with the throttling, that is not such a good idea as the error itself might be throttling and hence the error can cause an error. Writing to some target that you know will not fail is hence a good idea for logging errors. When you are done with the connections, it should look something like this:

Now it is time to build the actual flow. If you’d normally have a Source and a Target, it will now look something like the image below, which I will explain.

First of all, the Premium Derived Column creates a new column which simply contains the row number. It will look something like this: 

I like to use the components that are available in the Productivity pack from Kingswaysoft, and this Premium Derived Column is one of these. In this case I think it is actually equal if you use IncrementalValue() or RowIndex(). I think you can create this logic with a normal Derived Column too, it just has less features.

Next we need to create a Conditional split that divides the rows evenly between the three destination components. This is done using the mathematical operator modulus which is written using the “%”-sign. For those that didn’t study this in school, it simple means “the rest” in a division. For instance 5%3=2, if you divide 5 by 3 you will get 1 and a rest of 2. What we will do, is assign RowNr%3 == 0 to Case 1, RowNr%3 == 1 to Case 2 and the rest to Case 3. That should divide them evenly. It looks like this: 

You then create the three destination components. I typically create one first, copy it and change it, as that is faster. Make sure that you set the Connection Manager to the three different Target Connections.

I also recommend that you fiddle a bit with the batch size and the number of threads and test out which gives the best results for you and the entity and action you are working on. There is no one answer here. I would typically start at Batch 10, Threads 16.

Tuning DataFlow property settings

If you back out to the Control Flow view and right click on the Data Flow you have created, there are some other interesting setting you can twirk.

DefaultBufferMaxRows – 10 000

DefaultBufferSize – 10 485 760 (10MB)

EngineThreads – 10

These can also be tuned to allow for the Data Flow to handle more rows, more memory and use more parallell threads which of course will make it faster (if that is the bottle neck, typically not when working with Dynamics)

What I have found is changing the maxrows to 100k, the buffer size to 100 MB and engine threads to 32 will not hurt but you can find several other blog articles specializing in SSIS that discuss this.

Crude throttle handler

What I have noticed is that many of my Dataflows simple seem to grind to a halt after 400-600k rows read from Dynamics. Not sure if it the read or write part that is causing this but what I figured is that probably the most pragmatic way of solving this would be to create a loop that runs a data flow that is limited in the number of records, typically 400k, wait 5 minutes then iterate. Smartest version is of course to have a control variable which checks to see when when there are no more rows and then breaks the loop, simpler version is to just loop n number of times to cover the amount of data you are trying to move, ie. number of rows per iteration x number of iterations. It would look something like the picture to the left.

If you would like to refine the loop a bit to make it more automatic, create a variable of type Int, for instance RowCount, set the initial value to be 10 or something different from 0. Then set the EvalExpression to “@RowCount > 0”. After this add a RowCounter control to the Data Flow and connect this to the variable RowCount. When the Data Flow runs and returns 0 rows, it will run to the end, the EvalExpression will evaluate to “False” which will cause it to break.

Using this technique, I am able to remove several million records in just a few hours. With one of these jobs I managed to remove 20 GB of structured data in less than two days (no attachments or similar, just records). By adding more application accounts and of course both to the source and particulary to the destination side, you can increase the speeds you are getting.

I do also advise you to be on the lookout for Kingswaysofts new version which I think will come soon, and do as I, make sure to always download both the Dynamics and Productivity Pack. I have read that there are great things coming to the productivity pack!

Tips when migrating using Excel

Tips when migrating using Excel

The Excel import functionality in Dynamics CRM is quite good. Version 7.1 (2015 Spring Wave) introduced some new features, like finally being able to work with xlsx-files which helps out a lot.

Generally we recommend using ETL-tools like our favorite KingswaySoft in SSIS, and sometimes the only way to migrate really complex data is to write your own code, but it usually isn’t necessary (if you disagree, please leave a comment below!).

However, both ETL and especially code, takes some training to get going with and some of our customers and others I have spoke to have expressed a will to handle migration themselves which makes the Excel import the best candidate to work with as most people have experience with Excel.

First of all, my recommendation is to complete the customizations in the target system. That way, when you download the Import templates, you will get all the fields that are shown on the “standard” (fallback) form.


Excel Account Import Template (Swedish) from CRM 2016

As of CRM 2015 Spring wave (7.1) the Excel import template will be formatted as a excel table, which makes it easier to work with, I think.

During the work with migration of data, you can correct data in one of three places.
1. In the source system.
2. In the Excel files while transfering it.
3. In the target system/after migration

Typically the time when the live migration needs to be done, is as short as possible. As everyone needs to stop working in the old system, migration needs to be done, and then everyone can work in the new system. Hence it is typically done during evenings, nights or weekends, depending on which type of business you are in.

Due to this, you need to make sure that when you are doing the real live migration, you need to make sure that it will be as controlled and as smooth as possible. This requires you to first set up the migration and then test it properly. Dry runs are therefore a must unless you are CRM Rambo.

If you plan steps in the migration in the above described stage (2) – during the transfer, you will need to re-do these every time you do a dry run and when you do the live migration. If possible to change the data in the source system instead, for instance remove duplicates, you reduce risk and speed up the migration process.

Generally it is a really good idea to try to clean up you data before migrating it. Many are the CRM system owners who have understood quite a lot about how their users actually use the system, when the are to migrate the data and really start digging their head into it.

Some of the common problems when migrating with Excel are:

  • Complicated to handle GUIDs – ETL tools often have ways to migrate the GUID from a source system, very useful if moving from CRM Onprem to CRM Online.
  • Cannot handle updates/upserts easily. Can however upload several files at once instead. For instance, contacts have Parent accounts, and Accounts have Primary Contacts. Just make a zip with both xlsx-files and upload. CRM will figure out that they are interdependant.
  • Duplicates. Duplicates. Duplicates. So you switched off the duplicate detection for accounts and thought you’d be fine? Well, not so much, lookup fields to account, for instance, by default, will use the primary field, which is “name” and if you have several accounts with the same name, the import function will not know which to select and you will get an error. Typical fields where this is a problem are:
    • Contact – Parent Customer / Company (pointing to account)
    • Opportunity – Potential Customer / Account (pointing to account)
    • Opportunity – Contact
    • Account – Primary Contact
    • Account – Originating Lead
    • Contact – Originating Lead
    • Opportunity – Originating Lead
  • Only active? Are you only going to import active records? Will that work? Do active records have relationships to inactive records? For instance, you might have an active account that has an inactive primary contact. Or active accounts with inactive parent accounts. If only moving the active accounts and active contacts, the import will fail as the target system will not find the primary contact.
  • Activities. The activity parties, in other words the “to”, “cc”, “bcc”, “required”, “optional” etc. fields on activities are handled by a rather complex mapping entity called activity party. There is some support for migrating this with Excel but it is not very easy, so if you do have a lot of activities to migrate, I would strongly recommend using an ETL tool with support for activities.
  • If you add a column to the CRM 2016 Excel Template, despite having the Display name in CRM, it will not be automatically mapped like the other columns as there is underlying data to handle it. It is no big issue as the import mechanism usually interprets this correctly anyway. Do note that the Display name mapping is case sensitive and CRM does allow for duplicates in fields having the same Display name, but that doesn’t make importing easier.

Some tricks that I use

  • Generate an import template for the entity at hand, let’s say account from the target system, then remove all the columns you don’t want to import. Remove the entire column. Save this. Verify the template by filling in one or two rows by hand and importing. Make sure that the lookups match data in the system.
  • Export data from the source system in the same order to match the import template, if possible, into Excel. Then, verify that all columns are identical (ie. picklist are the same etc.) and then copy-as-values from the source excel sheet to the target excel sheet without the header columns.
  • Verify that the data in the target excel sheet is correct, that for instance there are cities in the city column, not street names.
  • Then import the data into CRM. The first couple of times you will get errors. If you don’t you are very very lucky. Migrating data is complicated, as data is seldom clean and well ordered. So, when it is done, go to the imports section in CRM and go through the errors and try to understand what it is trying to say. Typically a specific lookup cannot be found or it has multiple values. My suggestion is to fix it in the source data (1 in the list above) and not try to do it in the Excel sheet (2). Also plan for making several test runs of migration. Write down the steps you need to do when doing it live, so you have your plan set.
  • When importing data with lookups to data where there are lot’s of duplicates in the primary field, do note that you can change the mapping of the lookup field so that it mapps not on the primary field but on some other field instead. For instance, if there are several accounts with the same name but all accounts have different account numbers, you can use account number to indicate parent customer on a contact instead and then change the mapping when importing.
  • Make sure that if you do change data in Excel and use formulas, copy and paste-as-values back to the cells/columns as the import does not support formulas. (not sure if the new CRM 2015 Spring Wave/2016 does, havn’t tested, but I wouldn’t provoke it.)
  • All picklist values need to exist. Using the import templates is a good tool here as they include the possible values. But you can paste incorrect data into the cells anyway and then import it where you will get errors on the rows with the incorrect data.
  • Decide what is a good enough result before. Is 99% good enough? That would mean that if you have 100 000 accounts, 1000 accounts are not imported… so maybe that is not good enough. Remember Pareto’s law, that the last 20% take 80% of the work. So fixing the last 1% can be a real pain, why it is sometimes easier just do fix it manually after import.
  • Zip files with inter-dependencies. Like account-contact.
  • You can increase the max file upload size. but the max size for a file after uncompression is still 20 MB, if I am not mistaken. This means that you need to think about how you upload your data if you have large amounts of data. ETL tools might be a better option here as well.
  • After getting errors and getting an import of let’s say 50%, instead of trying fix the last 50% and importing those, I recommend deleting all and going back from the start. As you need to plan for doing many trial runs before doing a live migration, this is the only way to make sure that you get the source data better and better.

If you have done your own imports and migrations with Excel, I am sure you have some tips of your own, please share them below! I do moderate all comments to avoid spam.

Gustaf Westerlund
MVP, Founder and CTO at CRM-konsulterna AB
www.crmkonsulterna.se

Built in imports in CRM

I have been working with the built in import functionality for imports a bit lately and I must say that it has been improved a quite a lot. It as now reached a level where it is quite usable but there are still problematic areas you have to look out for.

I found this blog posting (http://blogs.msdn.com/b/crm/archive/2010/03/15/importing-multiple-files-using-zip-import.aspx) which was quite interesting and enlighted me to the fact that you can import zip:ed files which is really good since there are some size limitation on file uploads to CRM. Since you usually get really good compression rates on csv and xml files this is really good news.

For those of you who don’t know these limitations, the maximum upload file size to CRM is 8 MB. But if you zip the files the total size of files that can be contained within the zipfile can be up to 35 MB. Just to give you an example of the compression rates that can be achieved, we tried compressing a 70 MB xml based excel document and the zip-file we got was only 0.5 MB. That is a ratio of 1/140, less that 1% of the original size.

Zipping the import files is also good for uploading multiple files with at once, for instance when the files have dependencies or when there are attachments as this reduces the manual work a lot.

A bit of advice though. I would strongly advice against using the csv-format since it is very volatile and often brakes and gives rise to a lot of strange errors. It is also dependent on the local regional settings, for instance, in Sweden, it is not comma separated, but semi-colon separated, as this is the standard numeral separator. Very confusing.

On top of this you often have problems with codepages, if you work in other languages than english, and you have to re-save the file in UTF-8 to make it import properly. Today we also had some issues with Excel insisting on formating the Swedish personal number (Social Security Numbers) as 7.41231E+12 instead of the correct 7412311234. We had to manually force it with different kinds of formatting to save the number correctly.

It didn’t end there, Excel also found it fitting to add a few empty columns to the end of our CSV-file making it impossible to import into CRM.

So, we have been working to iron these things out and we were getting there but somewhere along the line we decided to skip the CSV and to go all in for the excel as xml format instead. The files that are saved are a lot bigger but with the zip feature it is managable.

Despite the fact that the new xml-format support and the zip-support exist I think the next time I will be even more vigourous in my recommendation for an import tool such as QuickBix Integration Suite, Scribe, or Import Manager. The new import features are great but for smaller imports, not for migrations.

Gustaf Westerlund
CEO, Chief Architect and co-Founder at CRM-konsulterna AB
www.crmkonsulterna.se